Disable Startup Apps Windows 11: The Ultimate Speed Boost Guide

disable startup apps windows 11 is one of the fastest and most powerful ways to dramatically improve your computer’s boot speed and overall performance — without spending a single dollar on hardware upgrades.

Here’s the truth:
Most Windows 11 PCs slow down over time not because of age — but because too many apps secretly launch at startup.

Every time you turn on your PC, dozens of background applications compete for memory, CPU power, and disk access. The result?

  • Slower boot times
  • Lag after login
  • Delayed app launches
  • Reduced battery life
  • Lower gaming performance

The good news? You can fix this in minutes.

This ultimate guide will show you exactly how to disable startup apps Windows 11 safely and effectively, even if you’re not tech-savvy.


Why You Must Disable Startup Apps Windows 11 Immediately

Before diving into steps, let’s understand why this matters.

Startup apps are programs configured to automatically launch when Windows boots. Many apps add themselves to startup without asking clearly.

Common examples include:

  • Microsoft Teams
  • OneDrive
  • Spotify
  • Zoom
  • Discord
  • Adobe Updater
  • Game launchers
  • Printer utilities

While some are necessary, most are optional.

The more startup apps you allow, the longer your PC takes to become usable.

When you disable startup apps Windows 11, you:

✅ Reduce boot time
✅ Improve system responsiveness
✅ Lower RAM usage
✅ Extend laptop battery life
✅ Increase gaming FPS stability

That’s why startup optimization is one of the first steps IT professionals take when fixing slow PCs.


How to Disable Startup Apps Windows 11 (Step-by-Step Methods)

There are four safe and effective methods.


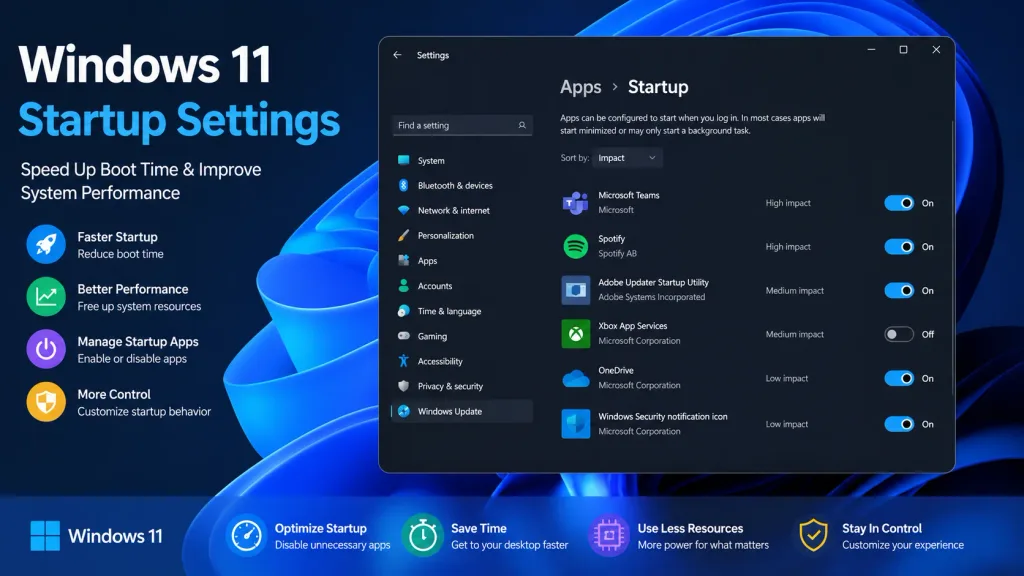
Method 1: Disable Startup Apps Windows 11 Using Settings (Recommended)

This is the easiest method for beginners.

Steps:

  1. Click the Start Menu
  2. Open Settings
  3. Click Apps
  4. Select Startup

You will now see a list of applications with toggle switches.

Turn OFF any app you don’t need launching automatically.


Understanding Startup Impact

Windows shows startup impact levels:

  • High Impact
  • Medium Impact
  • Low Impact

Start by disabling High Impact apps that are not essential.


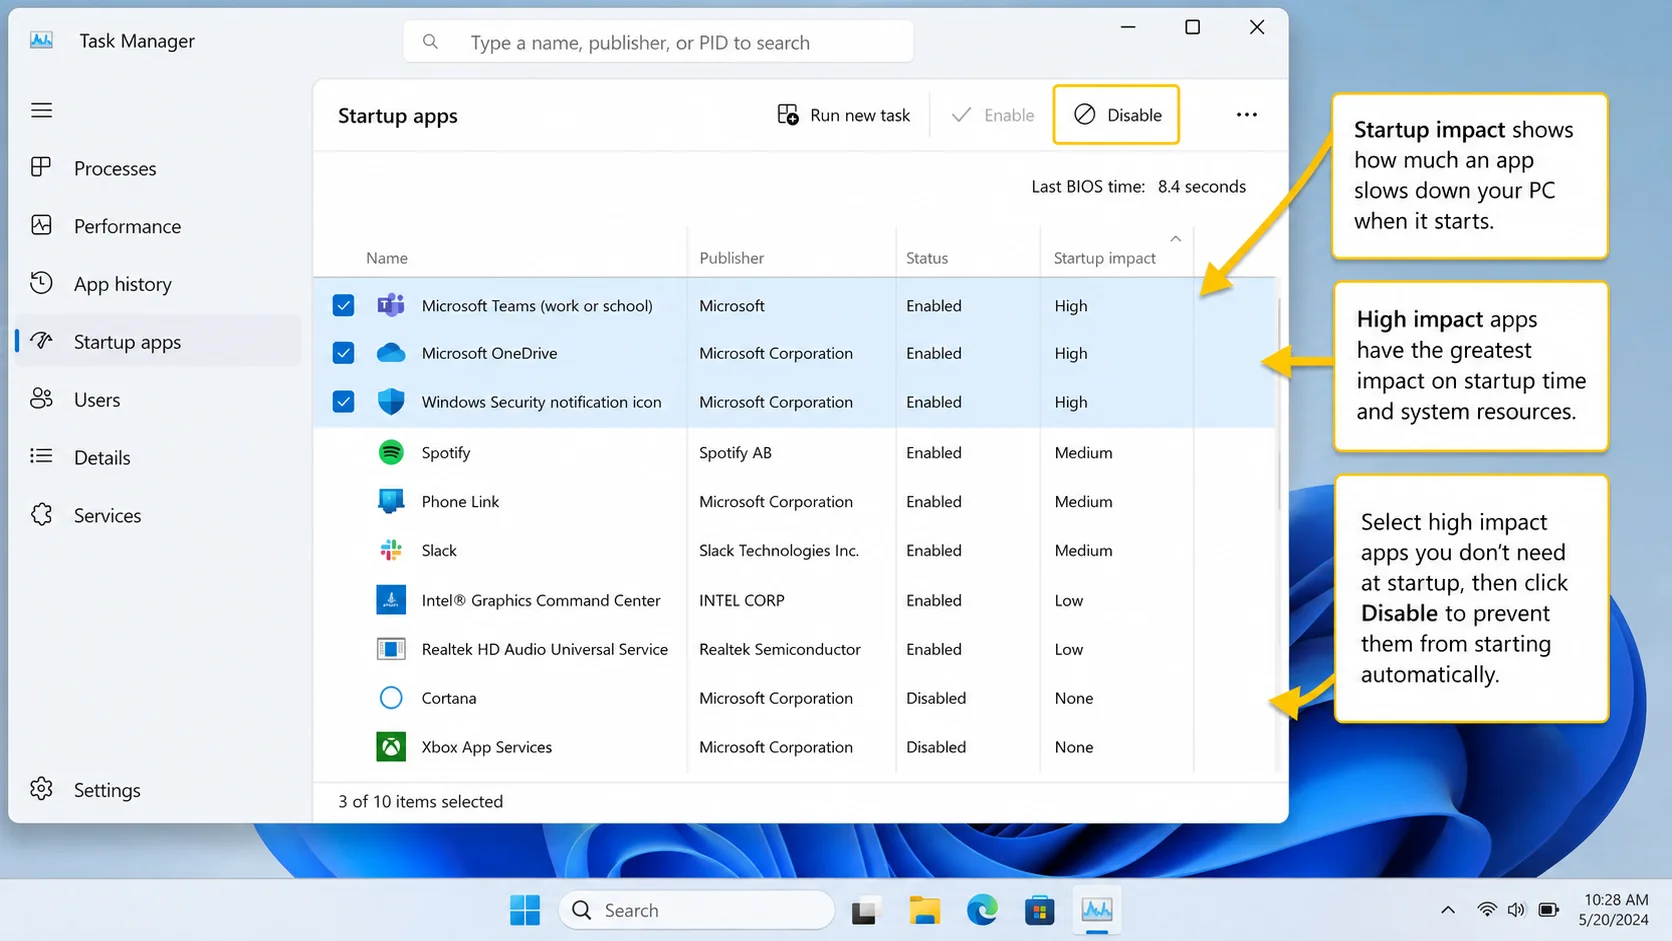
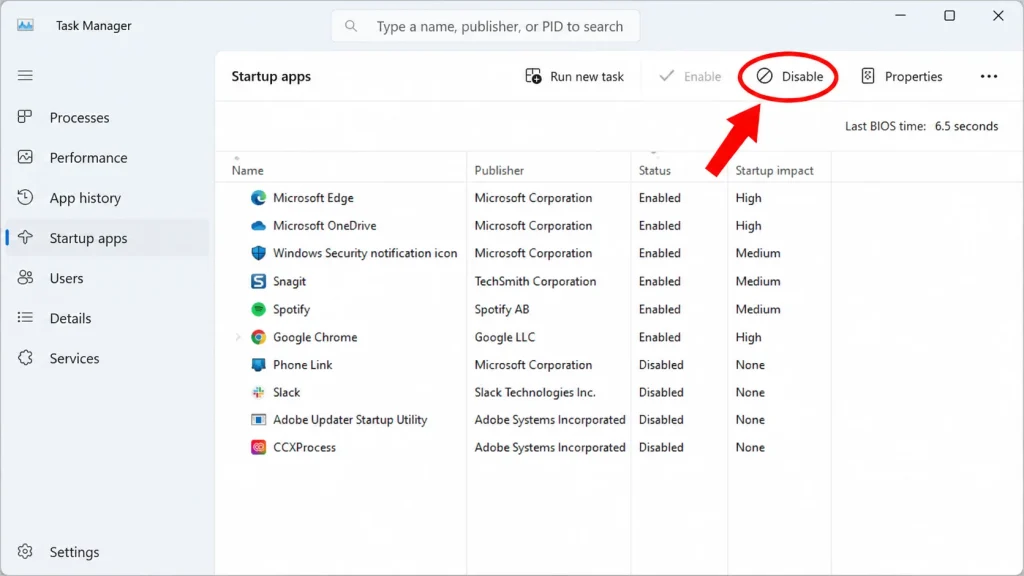
Method 2: Disable Startup Apps Windows 11 Using Task Manager

Task Manager provides deeper insight into startup behavior.

Steps:

  1. Press Ctrl + Shift + Esc
  2. Click the Startup tab
  3. Right-click any app
  4. Select Disable

Here you’ll see:

  • Publisher
  • Startup impact
  • Status

This method is ideal for users who want more control.


Method 3: Disable Startup Apps Windows 11 via Startup Folder

Some apps launch via shortcuts in the Startup folder.

Access It:

  1. Press Windows + R
  2. Type: shell:startup
  3. Press Enter

Delete any shortcut you don’t want launching at startup.


Method 4: Advanced – Disable Startup Apps Windows 11 Using MSConfig

⚠ Recommended for advanced users only.

  1. Press Windows + R
  2. Type msconfig
  3. Go to the Services tab
  4. Check “Hide all Microsoft services”
  5. Disable unnecessary third-party services

Only disable services you recognize.


Which Apps Should You Disable?

Not all startup apps are bad.

✅ Safe to Disable

  • Spotify
  • Skype
  • Zoom
  • Adobe Updater
  • Game launchers
  • Messaging apps

❌ Do NOT Disable

  • Antivirus software
  • Microsoft Defender
  • Graphics drivers
  • Touchpad drivers
  • Security services

For official Microsoft guidance, visit:
https://support.microsoft.com/windows/startup-settings


How Many Startup Apps Are Too Many?

Here’s a simple rule:

  • 3–5 startup apps → Ideal
  • 6–10 apps → Acceptable
  • 10+ apps → Slows system
  • 15+ apps → Major performance drop

After you disable startup apps Windows 11, restart your PC and measure boot improvement.


How to Measure Boot Time Improvement

Open Task Manager → Startup tab → Check “Last BIOS Time.”

Lower number = faster startup.

You can track improvement after making changes.


Disable Startup Apps Windows 11 for Gamers

Gamers benefit massively from startup optimization.

When you disable startup apps Windows 11:

  • More RAM becomes available
  • CPU load decreases
  • Background interruptions reduce
  • FPS becomes more stable

Disable launchers that don’t need to auto-start, such as:

  • Epic Games Launcher
  • Steam (optional)
  • Discord (if not needed instantly)

This alone can improve game performance noticeably.


Disable Startup Apps Windows 11 for Business Productivity

In business environments:

  • Faster boot = higher productivity
  • Less system lag
  • Reduced IT support tickets
  • Lower power consumption across offices

Startup optimization is one of the most underrated enterprise performance strategies.


Advanced Optimization Tips Beyond Startup Apps

Disabling startup apps Windows 11 is step one.

Here are additional powerful optimizations.


Enable Fast Startup

  1. Open Control Panel
  2. Select Power Options
  3. Click “Choose what the power buttons do”
  4. Enable Fast Startup

Upgrade to SSD

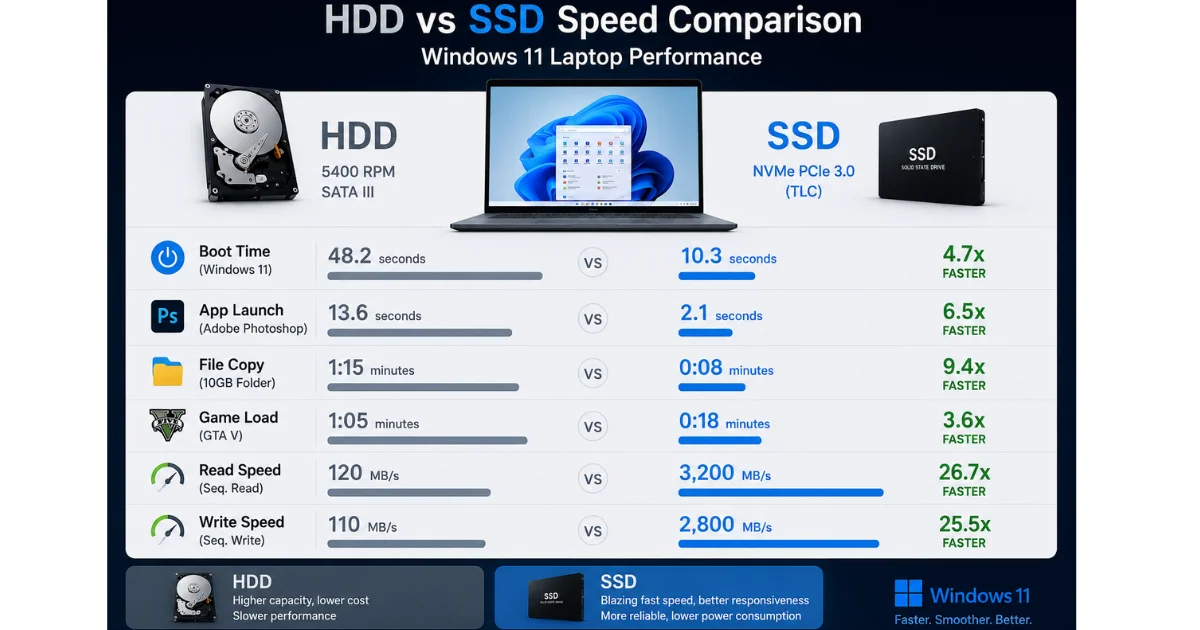
If your PC still uses HDD, upgrading to SSD provides dramatic speed improvements.


Uninstall Unnecessary Programs

Go to:

Settings → Apps → Installed Apps

Remove software you don’t use.

For more performance tips, read our full guide:
https://www.c-educate.com/how-to-speed-up-windows-11-on-a-low-end-laptop


Common Mistakes When Disabling Startup Apps Windows 11

Disabling Antivirus

Never disable real-time protection.

Disabling Driver Software

Graphics and hardware drivers are essential.

Disabling Unknown Services

Always research before disabling.


Troubleshooting: Startup Apps Keep Re-Enabling

Some apps force themselves back into startup.

Solutions:


Startup Apps vs Background Apps

Startup apps launch during boot.

Background apps run continuously.

Manage background apps:

Settings → Apps → Installed Apps → Advanced Options → Background Permissions


Frequently Asked Questions

Is it safe to disable startup apps Windows 11?

Yes, as long as you don’t disable essential security or system drivers.

No. It only prevents automatic launching.

Will disabling startup apps delete the program?

Can disabling startup apps improve performance instantly?

Yes. Many users notice faster boot time after one restart.

How often should I review startup apps?

Every 2–3 months.


Final Checklist to Disable Startup Apps Windows 11

✔ Open Settings → Apps → Startup
✔ Disable High Impact unnecessary apps
✔ Keep security software active
✔ Restart PC
✔ Measure improvement
✔ Re-adjust if needed


Powerful Conclusion: Take Back Control of Your PC

disable startup apps windows 11 is one of the simplest yet most powerful ways to reclaim speed, performance, and efficiency from your computer.

Instead of tolerating slow boot times and lag:

Take control.

Review your startup list today. Disable what you don’t need. Restart your PC. Measure the difference.

Small changes create dramatic performance gains.

Your faster Windows 11 experience starts now.

⚡ AUTOMATE THIS ENTIRE BLUEPRINT IN 10 SECONDS |

Our safe, lightweight optimization utility condenses this entire
guide into a single script.

It triggers an automated safety restore
point, strips structural telemetry, purges system bloatware, and
optimizes memory allocation with zero manual effort required.

💰 Secure Lifetime Access for Only $5

👉 [ Download the 1-Click Windows 11 Optimizer Now ]

Reduce RAM Usage in Windows 11: The Complete Performance Optimization Guide

**Reduce RAM Usage in Windows 11** to improve speed, eliminate lag, and make your PC run smoother—even on low-memory systems. Windows 11 is visually polished and feature-rich, but it can consume significant memory due to background services, startup applications, widgets, and visual effects.

If your system feels slow, freezes during multitasking, or shows high memory usage in Task Manager, this in-depth guide will help you optimize it step-by-step.

This article is written for everyday Windows users, students, office professionals, gamers, and remote workers who want practical and safe methods to free up memory and improve performance.

Why You Need to Reduce RAM Usage in Windows 11

RAM (Random Access Memory) is responsible for handling active tasks and running applications. When RAM usage is too high:

– Applications open slowly  

– The system freezes or lags  

– Browser tabs crash  

– Gaming FPS drops  

– Multitasking becomes difficult  

Windows 11 typically uses 3–5 GB of RAM at idle. If you have:

– **4GB RAM** → System may lag frequently  

– **8GB RAM** → Moderate performance  

– **16GB RAM** → Smooth multitasking  

Learning how to **Reduce RAM Usage in Windows 11** helps you maximize existing hardware without immediately upgrading.

For official Windows performance guidance, see Microsoft’s support page:  

🔗 https://support.microsoft.com/windows  

How to Reduce RAM Usage in Windows 11 Effectively

Below are proven, safe methods that deliver noticeable improvements.

Disable Startup Programs (Most Effective Step)

Many apps launch automatically and consume memory from boot.

### How to Disable:

1. Press **Ctrl + Shift + Esc**

2. Open **Task Manager**

3. Click **Startup Apps**

4. Right-click unnecessary apps → Disable

### Common Apps Safe to Disable:

– Microsoft Teams (Personal)

– Discord

– Spotify

– Adobe Updater

– Zoom

– Skype

Disabling startup apps is one of the fastest ways to **Reduce RAM Usage in Windows 11** without affecting system stability.

Close Unnecessary Background Processes

Some applications continue running even when closed.

### Steps:

1. Open **Task Manager**

2. Go to **Processes**

3. Sort by **Memory**

4. End non-essential high-memory tasks

⚠ Do not end critical system processes like:

– Windows Explorer  

– Service Host  

– System  

Managing background processes consistently helps **Reduce RAM Usage in Windows 11** during daily tasks.

Reduce Visual Effects

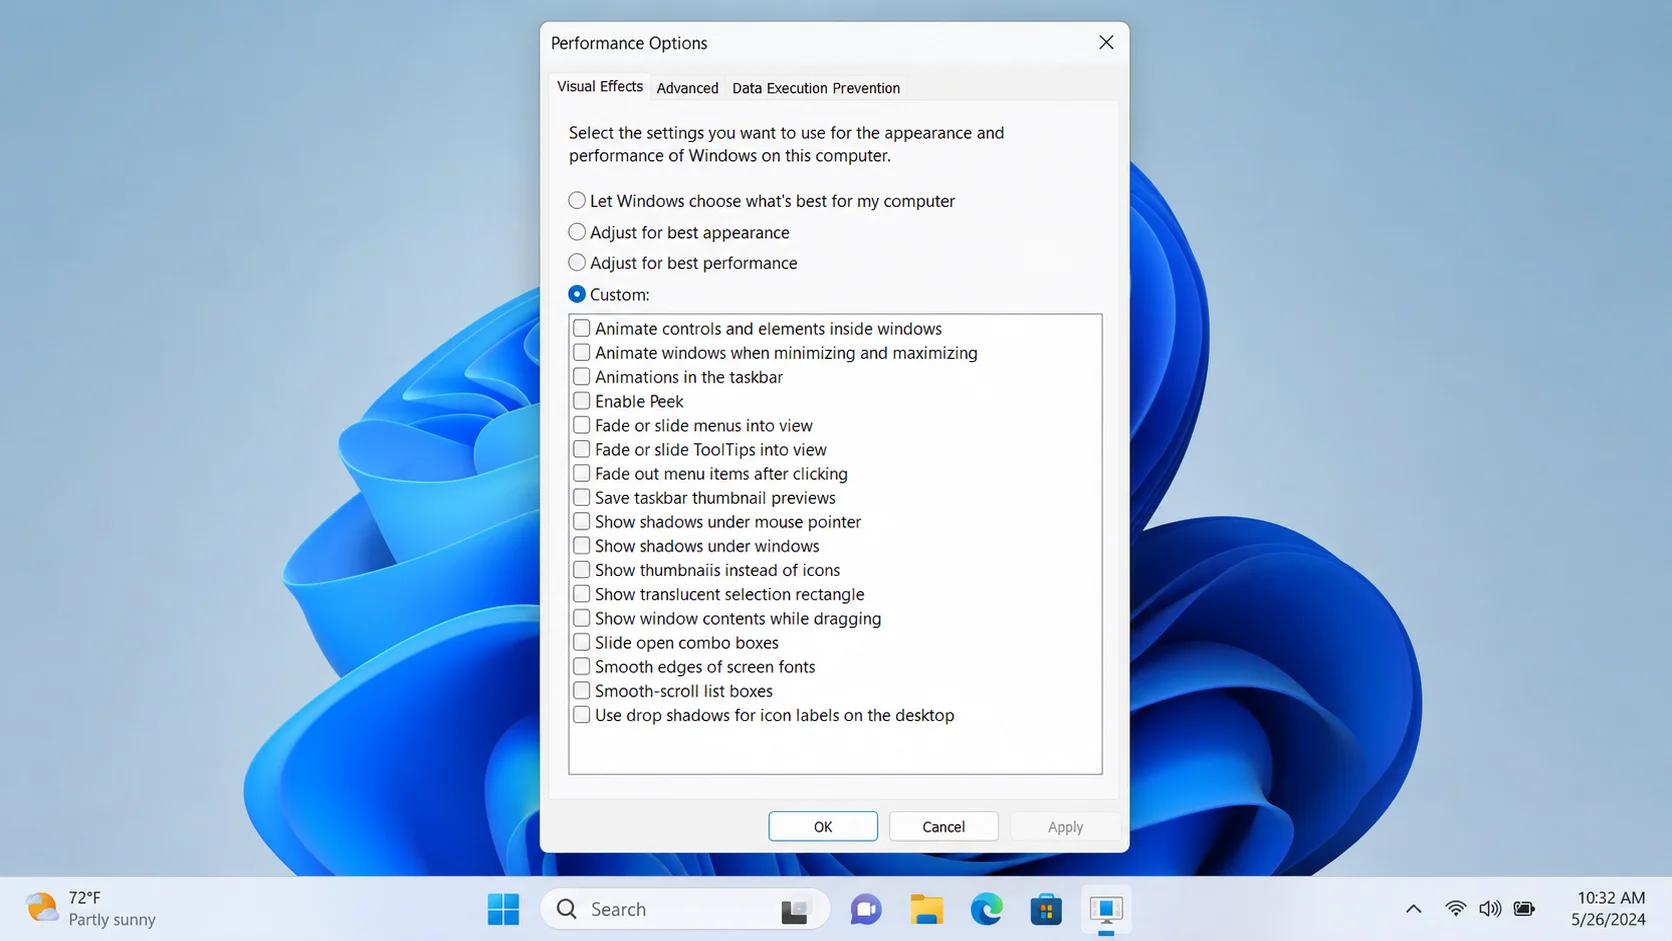
Windows 11 uses animations, shadows, and transparency that consume RAM.

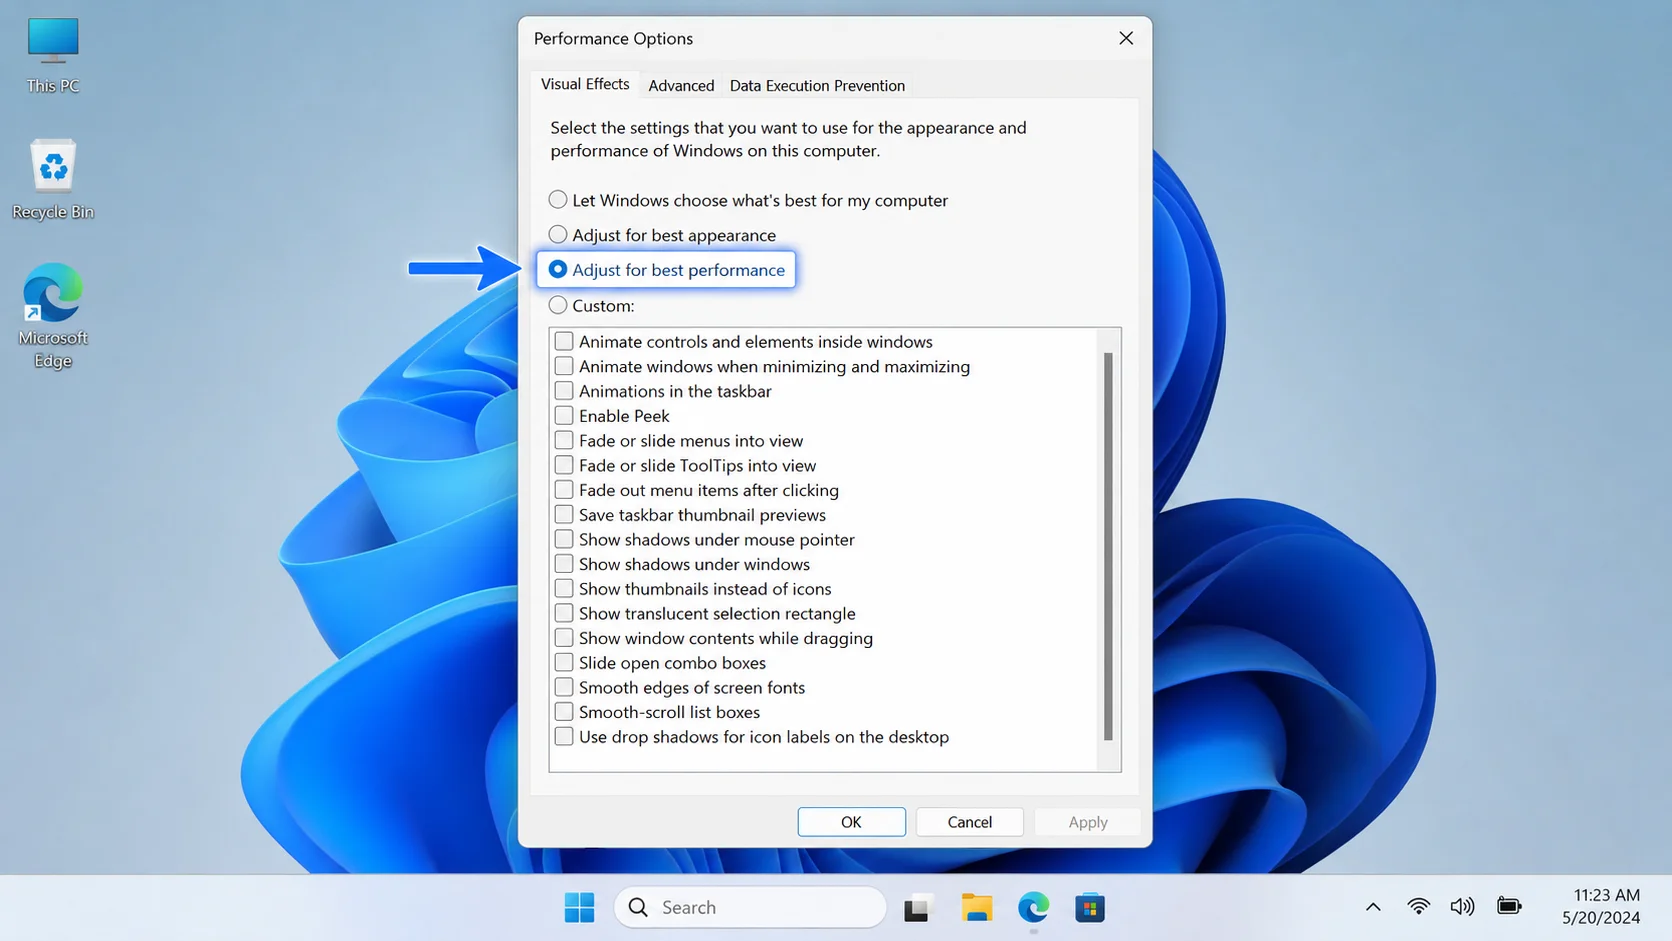
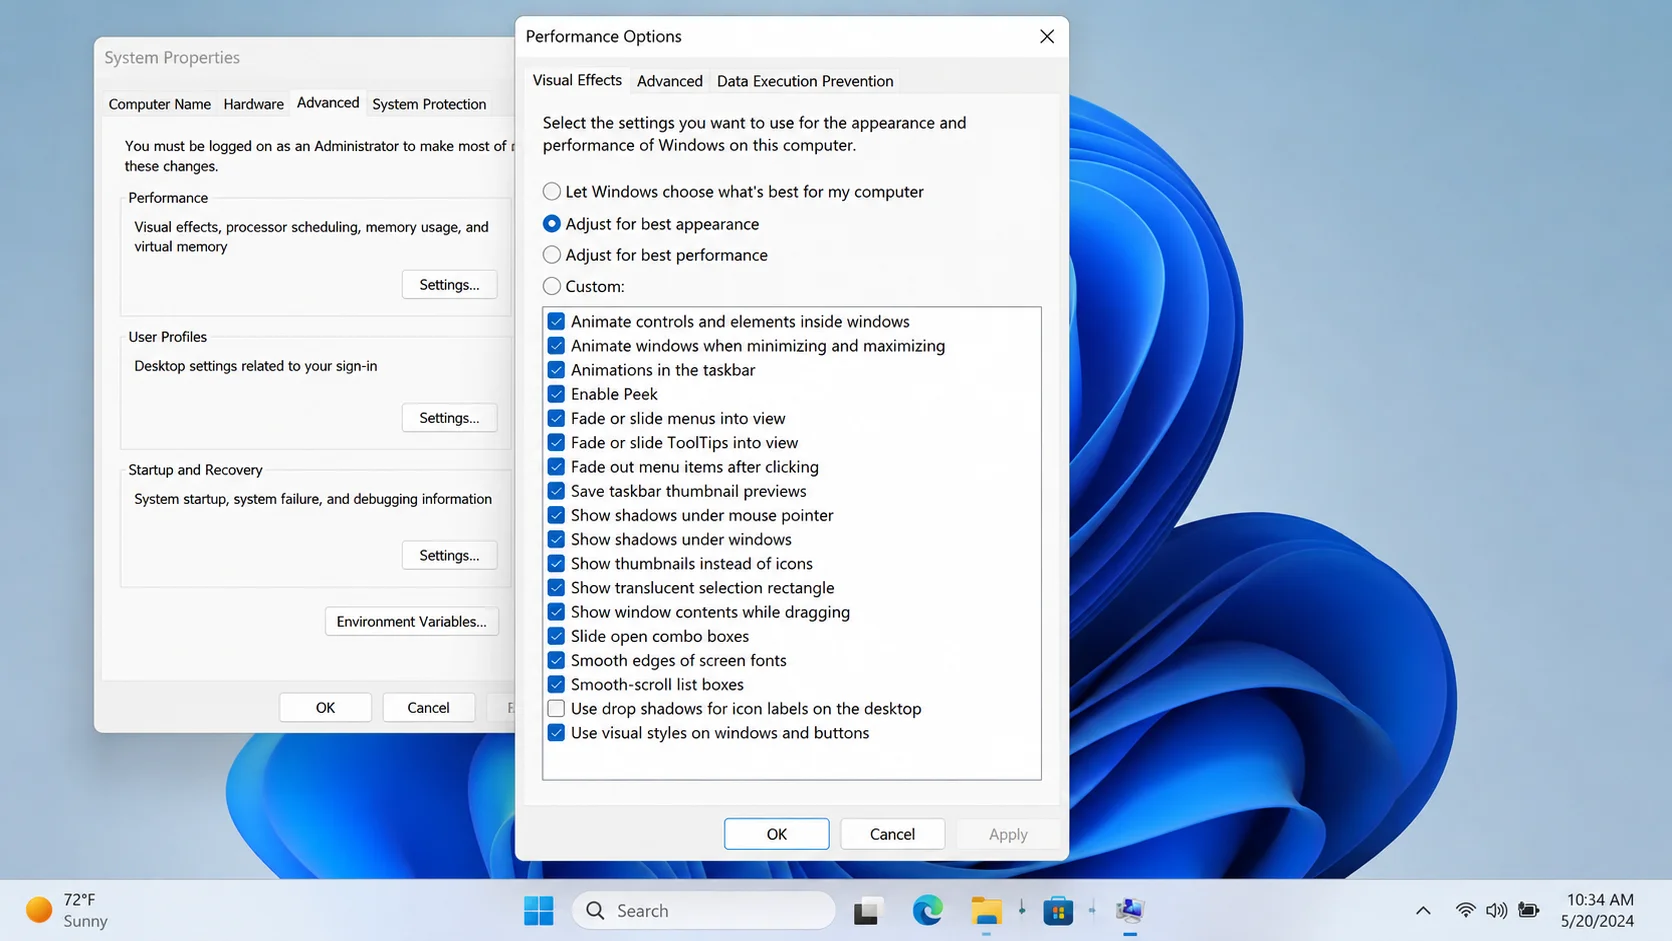
### Steps:

1. Press **Win + R**

2. Type `sysdm.cpl`

3. Go to **Advanced → Performance → Settings**

4. Select **Adjust for best performance**

Or disable manually:

– Animations

– Transparency

– Shadows

– Fade effects

Reducing visual effects can noticeably **Reduce RAM Usage in Windows 11**, especially on 4GB or 8GB systems.

Uninstall Bloatware and Unused Apps

Pre-installed apps and trial software run background services.

### Steps:

1. Go to **Settings → Apps → Installed Apps**

2. Remove:

   – Preinstalled games  

   – Trial antivirus software  

   – Manufacturer utilities  

   – Media apps you never use  

Removing unnecessary software lowers long-term memory consumption.

Disable Background App Permissions

Many apps run in the background even when unused.

### Steps:

1. Settings → Apps  

2. Select the app  

3. Advanced options  

4. Set **Background app permissions → Never**

This method is especially helpful on laptops and low-RAM devices.

Advanced Ways to Reduce RAM Usage in Windows 11

For power users looking for deeper optimization:

Optimize Virtual Memory (Paging File)

Virtual memory compensates when physical RAM is full.

### Steps:

1. Press **Win + R**

2. Type `sysdm.cpl`

3. Advanced → Performance → Settings  

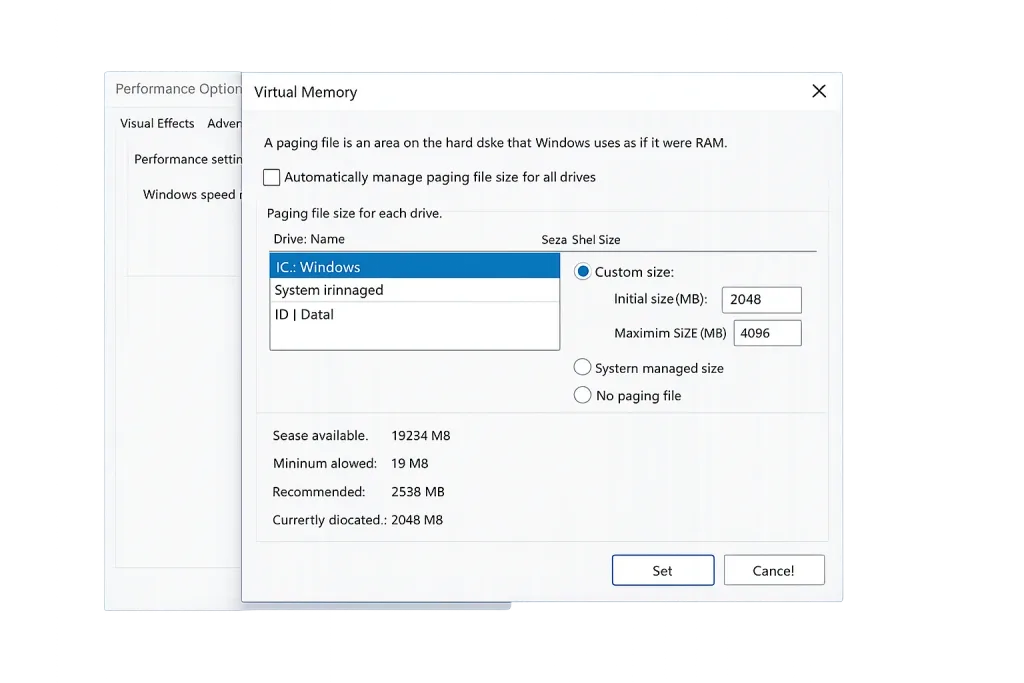
4. Advanced → Virtual Memory → Change  

Set:

– Initial size: 1.5 × RAM  

– Maximum size: 3 × RAM  

Optimizing paging improves responsiveness when RAM spikes.

Learn more about paging files here:  

🔗 https://learn.microsoft.com/windows  

Disable Widgets and Copilot

Widgets and AI services consume background memory.

### To Disable:

– Right-click Taskbar → Taskbar settings  

– Turn off **Widgets**  

– Turn off **Copilot**  

Turning off unnecessary features helps **Reduce RAM Usage in Windows 11** effectively.

Scan for Malware

Malware often consumes hidden memory.

### Run Scan:

1. Open **Windows Security**

2. Virus & Threat Protection  

3. Quick Scan  

Malware removal can significantly reduce unexplained RAM spikes.

Update Windows and Drivers

Outdated drivers can cause memory leaks.

– Settings → Windows Update  

– Install pending updates  

– Update GPU drivers  

Keeping software updated ensures memory efficiency.

Browser Optimization to Reduce RAM Usage in Windows 11

Browsers consume the most RAM on modern PCs.

### Tips:

– Close unused tabs  

– Remove unnecessary extensions  

– Use Edge Efficiency Mode  

– Enable Memory Saver in Chrome  

If Chrome uses too much memory, consider switching to Microsoft Edge, which is optimized for Windows 11.

Hardware Upgrade – The Long-Term Solution

If RAM usage exceeds 80% constantly:

| Current RAM | Recommended Upgrade |

|————|——————–|

| 4GB | Upgrade to 8GB |

| 8GB | Upgrade to 16GB |

| 16GB | Ideal for gaming/editing |

Upgrading RAM permanently solves high-memory limitations.

How Much RAM Usage Is Normal?

At idle:

– 4GB → 70–90% (Too high)  

– 8GB → 40–70% (Acceptable)  

– 16GB → 25–50% (Ideal)  

If your system exceeds 90% while idle, immediately take steps to **Reduce RAM Usage in Windows 11**.

Maintenance Checklist to Keep RAM Usage Low

Follow these habits:

✅ Restart weekly  

✅ Limit startup apps  

✅ Avoid unnecessary installations  

✅ Perform malware scans monthly  

✅ Keep only essential browser tabs open  

✅ Use Disk Cleanup regularly  

For more Windows optimization tips, check our guide on:  

🔗 *How to Speed Up Windows 11 for Better Performance*  

🔗 *Best SSD Upgrades for Windows PCs*  

Troubleshooting Persistent High RAM Usage

If memory remains high:

1. Check Task Manager for memory leaks  

2. Identify apps using 1GB+ RAM  

3. Reset Windows (last resort)  

4. Perform clean installation  

Final Thoughts

Learning how to **Reduce RAM Usage in Windows 11** is essential for maintaining fast, stable system performance. Most users can dramatically improve speed simply by disabling startup apps, limiting background processes, and reducing visual effects.

You don’t always need new hardware—proper optimization makes a major difference. However, if your system still struggles after applying these steps, upgrading RAM is the most effective long-term solution.

By following this complete guide, you can confidently **Reduce RAM Usage in Windows 11**, improve multitasking, boost productivity, and extend your PC’s lifespan.

⚡ AUTOMATE THIS ENTIRE BLUEPRINT IN 10 SECONDS

Our safe, lightweight optimization utility condenses this entire
guide into a single script.

It triggers an automated safety restore
point, strips structural telemetry, purges system bloatware, and
optimizes memory allocation with zero manual effort required.

💰 Secure Lifetime Access for Only $5

👉 [ Download the 1-Click Windows 11 Optimizer Now ]

Best Windows 11 Settings for 4GB RAM (Make It Fast & Usable Again)

Best Windows 11 Settings for 4GB RAM, Is Windows 11 slow on your 4GB RAM laptop?

Are you experiencing:

  • Freezing while opening Chrome
  • Lag when switching tabs
  • 100% disk usage
  • Delayed startup
  • Stuttering during basic tasks

You’re not alone.

Windows 11 is demanding — and 4GB RAM is the bare minimum requirement. Out of the box, it’s not optimized for low‑memory systems.

The good news?

With the right settings, you can make Windows 11 usable — even on 4GB RAM.

This guide shows you exactly how.

Best Windows 11 Settings for 4GB RAM, Can Windows 11 Run on 4GB RAM?

Yes — but not efficiently without optimization.

By default, Windows 11:

  • Runs background apps
  • Enables visual effects
  • Loads startup programs
  • Uses telemetry services
  • Preloads system features

On a 4GB system, this quickly consumes available memory.

When RAM runs out, Windows starts using your disk as virtual memory (paging file), which causes severe slowdowns.

That’s why proper configuration is essential.


Step 1: Disable Startup Apps (Big Impact)

Startup apps consume RAM immediately after boot.

How to Disable Startup Apps:

  1. Right‑click Start
  2. Click Task Manager
  3. Go to Startup
  4. Disable unnecessary apps

Focus on apps marked “High impact.”

Full guide:
👉 Disable Startup Apps in Windows 11

This alone can reduce memory usage significantly.


Step 2: Remove Background Apps

Many apps run silently in the background.

To disable them:

  1. Open Settings
  2. Click Apps
  3. Select Installed Apps
  4. Click Advanced Options
  5. Set Background App Permissions to “Never”

Detailed walkthrough:
👉 Remove Background Apps in Windows 11

Reducing background processes lowers RAM pressure instantly.


Step 3: Reduce Visual Effects

Animations and transparency consume memory and GPU resources.

Disable them:

  1. Press Windows + R
  2. Type sysdm.cpl
  3. Go to Advanced → Performance → Settings
  4. Select “Adjust for best performance”

Optional: Re-enable smooth fonts only.

Full tutorial:
👉 Reduce Visual Effects in Windows 11

On 4GB systems, this makes Windows feel noticeably faster.


Step 4: Fix 100% Disk Usage

Low RAM forces Windows to use the disk for virtual memory.

If your disk usage is constantly high:

👉 Fix 100% Disk Usage in Windows 11

Disabling SysMain and search indexing helps dramatically.


Step 5: Debloat Windows 11 Safely

Removing unnecessary apps reduces RAM usage permanently.

Read:
👉 How to Debloat Windows 11 Safely

Safe debloating reduces background activity and frees system resources.


Step 6: Optimize Power Settings

Power Saver mode limits CPU performance.

Switch to High Performance:

Control Panel → Power Options → High Performance

Detailed guide:
👉 Optimize Power Settings in Windows 11

This prevents CPU throttling during multitasking.


Step 7: Increase Virtual Memory (Advanced)

Virtual memory helps when RAM is limited.

Adjust Paging File:

  1. Press Windows + R
  2. Type sysdm.cpl
  3. Advanced → Performance → Settings
  4. Advanced → Virtual Memory → Change
  5. Uncheck “Automatically manage”
  6. Set custom size:
    • Initial size: 4096 MB
    • Maximum size: 8192 MB

This reduces freezing when RAM fills up.

Note: If you use an HDD, this may still feel slow.


Step 8: Use Lightweight Apps

On 4GB RAM, app choice matters.

Instead of:

  • Chrome with 20 tabs
  • Heavy antivirus programs
  • Background sync tools

Use:

  • Edge (optimized for Windows)
  • Lightweight text editors
  • Fewer simultaneous programs

Even system tuning cannot compensate for heavy workloads.


Step 9: Disable Widgets & Optional Features

Widgets consume background memory.

Disable:

Settings → Personalization → Taskbar → Turn off Widgets

Also remove unused optional features in:

Settings → Apps → Optional Features

Small improvements add up on 4GB systems.


Step 10: Update Drivers

Outdated drivers increase memory inefficiency.

Update via:

Settings → Windows Update → Optional Updates

Full guide:
👉 Update Drivers in Windows 11

Realistic Expectations on 4GB RAM

Let’s be honest.

Windows 11 on 4GB RAM will never feel like a high-end PC.

But with optimization, it can:

✅ Boot faster
✅ Handle light browsing
✅ Stream videos smoothly
✅ Run Office apps
✅ Perform basic multitasking

Optimization turns “unusable” into “functional.”


Should You Upgrade to 8GB RAM?

If your laptop allows RAM upgrades, moving to 8GB dramatically improves performance.

But many budget laptops have soldered RAM.

If upgrading isn’t possible, optimization is your best solution.


Manual Optimization vs 1‑Click Optimization

You can manually follow all 10 steps above.

But manual tuning:

  • Takes 45+ minutes
  • Requires adjusting multiple system areas
  • Is easy to forget after updates

The Win11Fly 1‑Click Script:

✅ Disables unnecessary services
✅ Reduces startup load
✅ Applies performance settings
✅ Adjusts safe background configurations
✅ Optimizes for low-memory systems

All in under 60 seconds.

👉 Download the Windows 11 Optimization Script

For 4GB systems, automation reduces mistakes.


Frequently Asked Questions

Is 4GB RAM enough for Windows 11?

Yes — but only with optimization and light usage.

Why is Windows 11 slow on 4GB RAM?

Because background processes and visual effects consume most available memory.

Will debloating break Windows?

Not if done safely.
👉 Read: Debloat Windows 11 Safely

Can I game on 4GB RAM?

Very light games only. For gaming optimization:
👉 Optimize Windows 11 for Gaming


Final Thoughts

Windows 11 is resource-heavy — but that doesn’t mean your 4GB laptop is useless.

By:

  • Disabling startup apps
  • Removing background apps
  • Reducing visual effects
  • Fixing disk usage
  • Adjusting virtual memory
  • Optimizing power settings

You can make your system usable again.

If you want the fastest, safest solution, the 1‑Click Script applies the most effective optimizations automatically.

You don’t need a new laptop.

You need smarter configuration.

💬 Did these settings help speed up your 4GB RAM PC? Share your experience in the comments below! If you found this guide helpful, share it with someone who needs it.

📖 Read Next:

  • How to Reduce RAM Usage in Windows 11
  • How to Debloat Windows 11 Safely
  • Best Lightweight Browsers for Slow PCs

⚡ AUTOMATE THIS ENTIRE BLUEPRINT IN 10 SECONDS

Our safe, lightweight optimization utility condenses this entire
guide into a single script.

It triggers an automated safety restore
point, strips structural telemetry, purges system bloatware, and
optimizes memory allocation with zero manual effort required.

💰 Secure Lifetime Access for Only $5
👉 [ Download the 1-Click Windows 11 Optimizer Now ]

Fix 100% Disk Usage in Windows 11 (Complete Step‑by‑Step Guide)

Is your Windows 11 Task Manager showing 100% disk usage — even when you’re not doing anything?

Does your PC feel:

  • Extremely slow
  • Frozen or unresponsive
  • Delayed when opening apps
  • Stuttering during gaming
  • Slow to boot

If so, high disk usage is likely the cause.

The good news?

You can fix 100% disk usage in Windows 11 safely — without reinstalling Windows.

This guide shows you exactly how.

What Does 100% Disk Usage Mean?

When your disk is at 100% usage, it means your storage drive (HDD or SSD) is fully occupied handling read/write operations.

Even if your CPU and RAM usage are low, disk bottlenecks can make your entire system feel slow.

This problem is especially common on:

  • Older HDD-based laptops
  • Budget SSD systems
  • 4GB or 8GB RAM computers
  • PCs after Windows updates

Step 1: Check What’s Causing High Disk Usage

Before fixing it, identify the cause.

How to Check Disk Usage:

  1. Press Ctrl + Shift + Esc
  2. Open Task Manager
  3. Click the Processes tab
  4. Click the Disk column to sort by usage

Look for:

  • SysMain
  • Windows Search
  • Antimalware Service Executable
  • Update processes
  • Third-party apps

If your system is generally slow, start here:
👉 How to Speed Up Windows 11


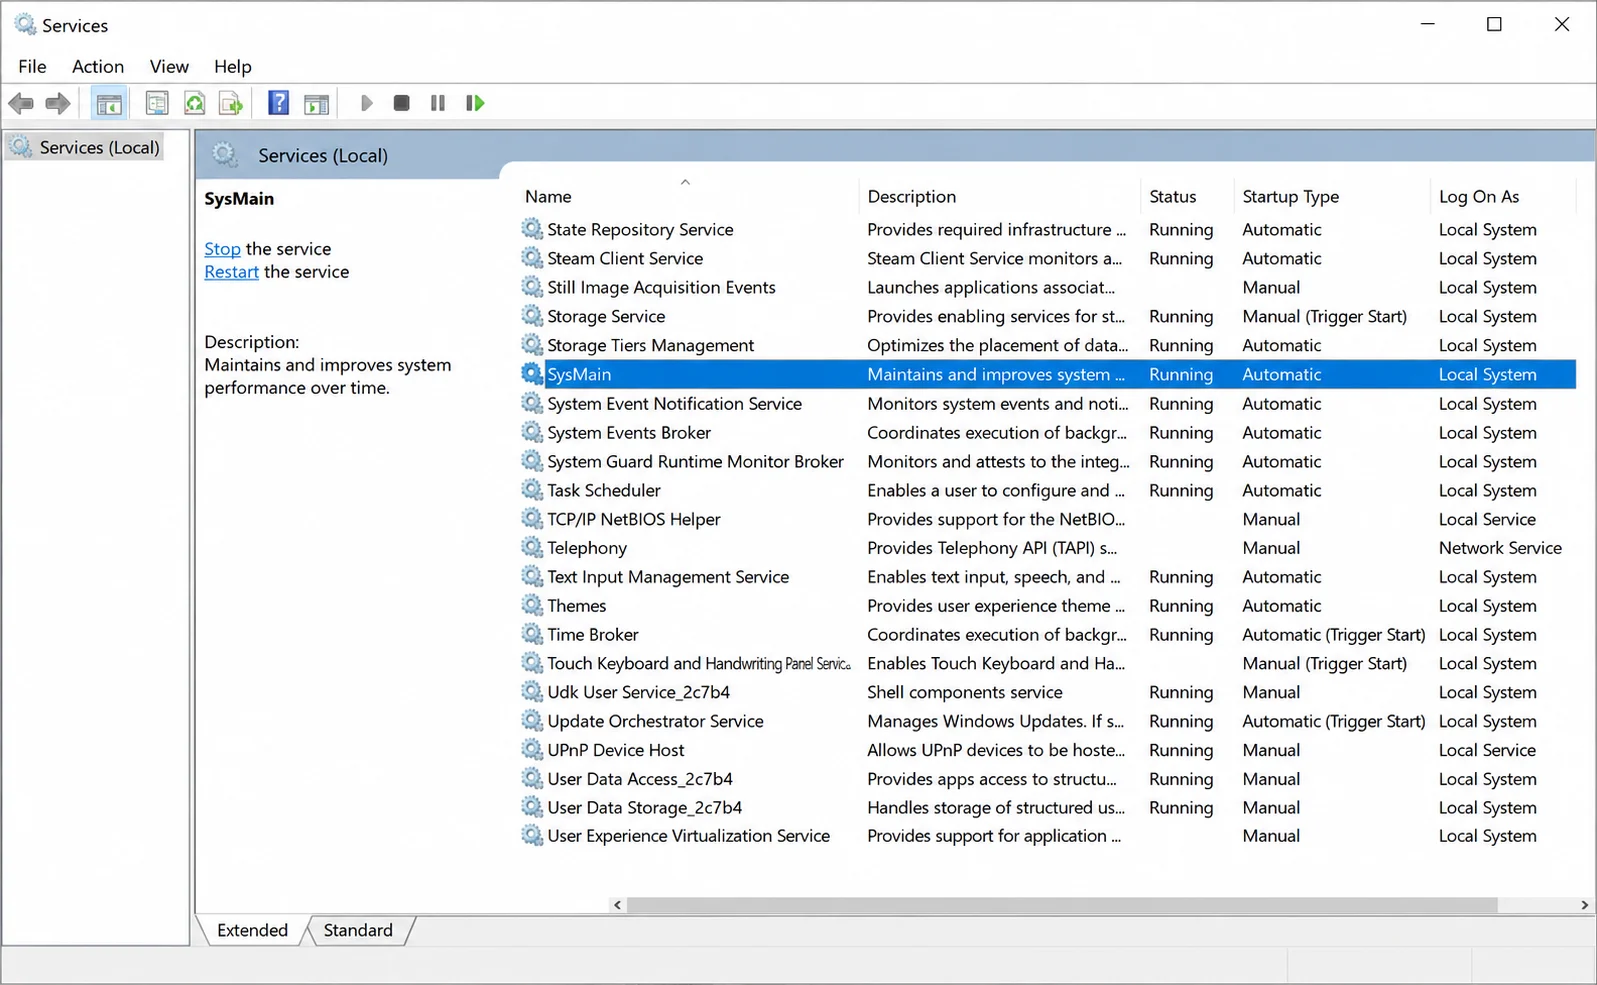
Step 2: Disable SysMain (Superfetch)

SysMain is one of the most common causes of 100% disk usage.

It preloads apps into memory — but on low-end PCs, it can overload your drive.

Disable SysMain:

  1. Press Windows + R
  2. Type services.msc
  3. Find SysMain
  4. Right-click → Stop
  5. Set Startup Type to Disabled

Restart your PC and check disk usage again.

This fix alone resolves the issue for many users.


Step 3: Disable Windows Search Indexing

Search indexing constantly scans your drive.

On slower drives, this causes high disk activity.

Disable Windows Search:

  1. Press Windows + R
  2. Type services.msc
  3. Find Windows Search
  4. Right-click → Stop
  5. Set Startup Type to Disabled

If you rely heavily on file search, you can leave it enabled — but many low-end PCs benefit from disabling it.


Step 4: Disable Startup Apps

Too many startup programs increase disk activity immediately after boot.

Disable Startup Apps:

  1. Open Task Manager
  2. Go to Startup
  3. Disable unnecessary programs

Full tutorial here:
👉 Disable Startup Apps in Windows 11

Reducing startup load lowers disk strain.


Step 5: Remove Background Apps

Apps running in the background can constantly access the disk.

Disable them:

Settings → Apps → Installed Apps → Advanced Options → Background Permissions → Never

Detailed guide:
👉 Remove Background Apps in Windows 11

This reduces disk and RAM pressure.


Step 6: Check for Windows Updates

Sometimes high disk usage is caused by incomplete or pending updates.

Go to:

Settings → Windows Update → Check for Updates

Install updates and restart your PC.

If disk usage started after an update, check:
👉 Windows 11 Slow After Update Fix (create this supporting page later)


Step 7: Run Check Disk (Scan for Errors)

Corrupted sectors can cause disk overload.

Run CHKDSK:

  1. Search for Command Prompt
  2. Right-click → Run as Administrator
  3. Type:
textchkdsk /f /r
  1. Press Enter
  2. Restart when prompted

This scans and repairs disk errors.


Step 8: Upgrade from HDD to SSD (If Applicable)

If you’re using an HDD, 100% disk usage is much more common.

Switching to an SSD dramatically improves performance.

However, even SSD users can experience high disk usage due to background services.


Step 9: Reduce RAM Pressure (Important)

Low RAM forces Windows to use the disk as virtual memory (paging file).

If you have 4GB RAM, this is very common.

Optimize RAM usage:

👉 Best Windows 11 Settings for 4GB RAM
👉 Reduce RAM Usage in Windows 11

Lower RAM usage = lower disk swapping.


Step 10: Adjust Power Settings

Power Saver mode can cause disk throttling.

Switch to High Performance:

Control Panel → Power Options → High Performance

Full guide:
👉 Optimize Power Settings in Windows 11


Step 11: Check Antivirus Activity

Windows Defender scans can temporarily spike disk usage.

To check:

  1. Open Task Manager
  2. Look for Antimalware Service Executable

If it spikes constantly, allow the scan to finish.

Do NOT disable Defender permanently.

00% Disk Usage After Windows 11 Update?

If disk usage started after a major update:

  • Disable SysMain
  • Disable Windows Search
  • Restart multiple times
  • Let updates fully finish installing

Updates can temporarily spike disk usage.

Manual Fix vs 1‑Click Optimization

You can manually follow all 11 steps above.

But manual troubleshooting:

  • Takes 30–60 minutes
  • Requires navigating multiple system areas
  • Is easy to miss something

The Win11Fly 1‑Click Script automatically:

✅ Disables unnecessary services
✅ Optimizes startup
✅ Reduces background activity
✅ Adjusts performance settings
✅ Applies safe disk-related tweaks

All in under 60 seconds.

👉 Fix My Slow Windows 11 PC Now

Frequently Asked Questions

Why is my disk at 100% but nothing is running?

Background services like SysMain or Windows Search are often the cause.

Is 100% disk usage dangerous?

It won’t damage your drive immediately, but it severely impacts performance.

Does SSD get 100% disk usage?

Yes — though it’s less common than HDDs.

Will upgrading RAM fix it?

Often yes — especially on 4GB systems.


✅ Final Thoughts

100% disk usage in Windows 11 is one of the most common causes of slow performance.

By:

  • Disabling SysMain
  • Turning off search indexing
  • Reducing startup apps
  • Removing background processes
  • Optimizing RAM usage
  • Updating Windows

You can dramatically improve responsiveness.

If you prefer a faster, automated solution, the 1‑Click Script applies the most effective fixes safely.

You don’t need to reinstall Windows.

You just need proper optimization.

⚡ AUTOMATE THIS ENTIRE BLUEPRINT IN 10 SECONDS

Our safe, lightweight optimization utility condenses this entire
guide into a single script.

It triggers an automated safety restore
point, strips structural telemetry, purges system bloatware, and
optimizes memory allocation with zero manual effort required.

💰 Secure Lifetime Access for Only $5

👉 [ Download the 1-Click Windows 11 Optimizer Now ]

How to Optimize Windows 11 for Gaming on Low-End PCs

Optimize Windows 11 for Gaming on Low-End PCs , Is your game stuttering on Windows 11?

Are you experiencing:

  • FPS drops
  • Input lag
  • Freezing during gameplay
  • High CPU usage
  • Sudden frame spikes

If you’re gaming on a low-end PC with 4GB or 8GB RAM, Windows 11’s default settings can hurt performance.

The good news?

You can optimize Windows 11 for gaming safely — without installing risky “FPS booster” software.

This guide walks you through step-by-step gaming optimization methods that actually work.

 Why Gaming Is Slow on Low-End PCs with Windows 11

Windows 11 includes:

  • Background apps
  • Telemetry processes
  • Startup programs
  • Visual effects
  • Xbox services
  • Power-saving restrictions

On high-end PCs, this is manageable.

On budget systems with:

  • Integrated graphics (Intel HD / UHD)
  • Older CPUs
  • 4GB or 8GB RAM

…it causes performance bottlenecks.

If your PC feels slow outside of gaming too, start with:
👉 How to Speed Up Windows 11

How to Optimize Windows 11 for Gaming on Low-End PCs (Step-by-Step)

Step 1: Enable Game Mode

Windows 11 includes a built-in Game Mode that prioritizes gaming processes.

How to Enable Game Mode:

  1. Open Settings
  2. Click Gaming
  3. Select Game Mode
  4. Turn it ON

Game Mode reduces background tasks while gaming.

It won’t magically double FPS — but it improves stability.


Step 2: Disable Startup Apps Before Gaming

Many apps launch at startup and continue running during gameplay.

Common performance drains:

  • Discord auto-start
  • Cloud sync apps
  • Adobe services
  • Update managers

Disable them:

  1. Right-click Start
  2. Open Task Manager
  3. Go to Startup
  4. Disable unnecessary apps

Full guide here:
👉 Disable Startup Apps in Windows 11

Reducing startup load frees RAM for games.


Step 3: Remove Background Apps

Background apps compete for CPU and memory.

Disable unnecessary background apps:

Settings → Apps → Installed Apps → Advanced Options → Background Permissions → Never

Detailed tutorial:
👉 Remove Background Apps in Windows 11

This is especially important on 8GB RAM systems.


Step 4: Reduce Visual Effects

Windows animations consume GPU resources — even while gaming.

To disable visual effects:

  1. Press Windows + R
  2. Type sysdm.cpl
  3. Go to Advanced → Performance → Settings
  4. Select “Adjust for best performance”

You can also turn off transparency:

Settings → Personalization → Colors → Disable Transparency

Full breakdown:
👉 Reduce Visual Effects in Windows 11

This improves responsiveness and can reduce micro-stutters.


Step 5: Update Graphics Drivers

Outdated GPU drivers are a major cause of FPS drops.

Update your graphics drivers directly from:

  • Intel
  • NVIDIA
  • AMD

Or via:

Settings → Windows Update → Optional Updates

Full tutorial:
👉 Update Drivers in Windows 11

Updated drivers improve compatibility and stability.


Step 6: Optimize Power Settings for Maximum FPS

Windows may throttle CPU performance in Balanced mode.

Switch to High Performance:

  1. Open Control Panel
  2. Go to Power Options
  3. Select High Performance

Advanced users can also:

  • Set Minimum processor state to 100%
  • Set Maximum processor state to 100%

Detailed guide:
👉 Optimize Power Settings in Windows 11

This prevents CPU throttling during gaming.


Step 7: Disable Xbox Game Bar (Optional)

Xbox Game Bar runs background services.

If you don’t use it:

  1. Go to Settings
  2. Click Gaming
  3. Select Xbox Game Bar
  4. Turn it OFF

This reduces background load slightly.


Step 8: Fix 100% Disk Usage Before Gaming

If your disk is at 100%, gaming performance will suffer.

Fix common causes:

  • Disable SysMain
  • Reduce indexing
  • Remove startup overload

Full solution:
👉 Fix 100% Disk Usage in Windows 11

Disk bottlenecks can cause severe stuttering.


Step 9: Optimize Windows 11 for 4GB RAM Gaming

If you’re gaming on 4GB RAM, performance tuning becomes critical.

Read:
👉 Best Windows 11 Settings for 4GB RAM

Reducing background memory usage is essential.


Step 10: Lower In-Game Settings (Important)

Windows optimization helps — but game settings matter too.

Lower:

  • Shadow quality
  • Anti-aliasing
  • Texture resolution
  • Background detail

Set resolution to 720p if needed.

Optimization is about balance.

Manual Optimization vs 1‑Click Gaming Optimization

You can manually follow all steps above.

But manual tuning:

  • Takes 30–60 minutes
  • Requires checking multiple system areas
  • Is easy to forget before gaming

The Win11Fly 1‑Click Optimization Script automatically:

✅ Reduces background services
✅ Adjusts performance settings
✅ Optimizes startup behavior
✅ Tweaks power configuration
✅ Applies safe gaming-friendly settings

Takes under 60 seconds.

👉 Download the Windows 11 Optimization Script

Frequently Asked Questions

Does Windows 11 reduce FPS compared to Windows 10?

On low-end hardware, default Windows 11 settings can use more background resources — but proper optimization resolves this.

Is Game Mode enough?

Game Mode helps, but deeper system optimization delivers better results.

Will optimization increase FPS?

It improves stability and reduces drops. FPS gains depend on hardware.

Is debloating good for gaming?

Yes — reducing background activity improves performance consistency.
👉 Read: How to Debloat Windows 11 Safely


Final Thoughts

Gaming on Windows 11 doesn’t require expensive hardware.

It requires smart configuration.

By:

  • Disabling startup apps
  • Removing background apps
  • Updating drivers
  • Adjusting power settings
  • Reducing visual effects
  • Fixing disk usage

You can significantly improve gaming performance on low-end PCs.

If you want a faster method, the 1‑Click Script safely automates the most effective gaming optimizations.

You don’t need a new GPU.

You need better optimization.

⚡ AUTOMATE THIS ENTIRE BLUEPRINT IN 10 SECONDS


Our safe, lightweight optimization utility condenses this entire

guide into a single script. It triggers an automated safety restore
point, strips structural telemetry, purges system bloatware, and
optimizes memory allocation with zero manual effort required.

💰 Secure Lifetime Access for Only $5

👉 [ Download the 1-Click Windows 11 Optimizer Now ]

Proven Windows 11 Optimization Guide for Speed

Proven Windows 11 Optimization Guide for Speed, Is your Windows 11 PC running slow?

Whether you’re dealing with:

  • 100% disk usage
  • High RAM usage
  • Slow boot times
  • FPS drops while gaming
  • Lag after updates

This hub contains every safe, beginner‑friendly guide you need to speed up Windows 11.

All tutorials are tested on low‑end laptops and budget PCs.

Start Here: Core Optimization Guides

These are your foundational guides.

Proven Windows 11 Optimization Guide for Speed, How to Speed Up Windows 11 (Complete Guide)

A full beginner walkthrough covering startup optimization, visual effects, background apps, disk fixes, and more.

👉 Read the Complete Speed Up Guide →

🧹 How to Debloat Windows 11 Safely

Remove unnecessary apps and background services without breaking your system.

👉 Learn How to Debloat Windows 11 →


🎮 Optimize Windows 11 for Gaming

Reduce FPS drops, lower input lag, and improve stability on low-end PCs.

👉 Improve Gaming Performance →

💾 Fix 100% Disk Usage in Windows 11

Step‑by‑step fixes for SysMain, indexing, startup overload, and more.

👉 fix-100-disk-usage-windows-11

💻 Best Windows 11 Settings for 4GB RAM

Make Windows 11 usable on low‑memory laptops.

👉 best-settings-4gb-ram

🧠 Reduce RAM Usage in Windows 11

Free up memory and prevent constant freezing.

👉 reduce-ram-usage-windows-11

⚡ Fix Slow Boot Time in Windows 11

Reduce startup delay and load time.

👉 fix-slow-boot-time-windows-11

Performance Tweaks (Step‑by‑Step Tutorials)

Disable Startup Apps in Windows 11

disable-startup-apps-windows-11


Remove Background Apps

/remove-background-apps-windows-11


Reduce Visual Effects

/reduce-visual-effects-windows-11


Optimize Power Settings

/optimize-power-settings-windows-11


Update Drivers for Better Performance

/update-drivers-windows-11

After Windows Update Fixes

Windows updates can cause sudden slowdowns.

Recommended reads:

  • Windows 11 Slow After Update Fix
  • Fix Lag After 23H2 Update
  • High Disk Usage After Update

(You’ll create these next for traffic spikes.)

Not Sure What’s Slowing Your PC?

If you don’t know what the issue is, start here:

👉 How to Speed Up Windows 11 → 

It walks through the full optimization process.

Want the Fastest Solution?

You can manually follow the guides above.

Or…

Use the Win11Fly 1‑Click Optimization Script to automate the most effective tweaks safely.

✅ Takes under 60 seconds
✅ Beginner friendly
✅ Fully reversible
✅ Designed for low-end PCs

👉 Fix My Slow Windows 11 PC Now → 

Frequently Asked Questions

What is the safest way to speed up Windows 11?
Follow safe optimization methods such as disabling startup apps, removing background apps, and adjusting performance settings.

Can Windows 11 run well on 4GB RAM?
Yes, with proper optimization and reduced background activity.

Is debloating Windows 11 safe?
Yes, when removing only non-essential apps and avoiding system file deletion.

⚡ AUTOMATE THIS ENTIRE BLUEPRINT IN 10 SECONDS


Our safe, lightweight optimization utility condenses this entire
guide into a single script. It triggers an automated safety restore
point, strips structural telemetry, purges system bloatware, and
optimizes memory allocation with zero manual effort required.

💰 Secure Lifetime Access for Only $5

👉 [ Download the 1-Click Windows 11 Optimizer Now ]

How to Speed Up Windows 11 (Complete Beginner Guide)

If your Windows 11 laptop feels slow, laggy, or unresponsive, you’re not alone.

Many users experience:

  • Slow boot times
  • High RAM usage
  • 100% disk usage
  • Freezing during multitasking
  • FPS drops while gaming

The good news?

You can speed up Windows 11 safely — even on low‑end PCs with 4GB or 8GB RAM.

This guide walks you through proven, beginner‑friendly methods to improve Windows 11 performance step by step.

 Why Windows 11 Feels Slow

Windows 11 includes:

  • Background services
  • Startup applications
  • Visual effects
  • Telemetry processes
  • Preinstalled apps

On budget laptops, these consume valuable CPU and RAM resources.

If you’re running Windows 11 on older hardware, optimization is essential.

Step 1: Disable Startup Apps

Startup programs are one of the biggest causes of slow boot time.

How to Disable Startup Apps:

  1. Right‑click Start
  2. Click Task Manager
  3. Go to the Startup tab
  4. Disable high‑impact apps

Focus on apps you don’t need immediately after boot.

👉 For a full breakdown, read:
How to Disable Startup Apps in Windows 11

Step 2: Reduce Visual Effects

Windows 11 animations can slow down low‑end systems.

Adjust Performance Settings:

  1. Press Windows + R
  2. Type sysdm.cpl
  3. Go to Advanced → Performance → Settings
  4. Choose “Adjust for best performance”

This improves responsiveness instantly.

👉 Detailed tutorial:
Reduce Visual Effects in Windows 11

Step 3: Remove Background Apps

Apps running in the background increase RAM usage.

Disable unnecessary background apps:

Settings → Apps → Installed Apps → Advanced Options → Background Permissions → Never

👉 Learn more:
How to Remove Background Apps in Windows 11

Step 4: Fix 100% Disk Usage

If your disk usage is constantly high, your PC will feel slow even when idle.

Common causes:

  • SysMain service
  • Windows Search indexing
  • Startup processes

👉 Full guide:
Fix 100% Disk Usage in Windows 11

Step 5: Optimize Power Settings

Many laptops run in “Balanced” mode.

Switching to High Performance improves speed.

Control Panel → Power Options → High Performance

👉 Full walkthrough:
Optimize Power Settings for Windows 11

Step 6: Update Drivers

Outdated drivers can cause:

  • Lag
  • Freezing
  • FPS drops
  • Audio glitches

Always update:

  • Graphics drivers
  • Network drivers
  • Chipset drivers

👉 Read:
How to Update Drivers in Windows 11

Bonus: Speed Up Windows 11 on 4GB RAM

If you’re using a 4GB RAM laptop, optimization becomes even more important.

👉 Read:
Best Windows 11 Settings for 4GB RAM

Manual vs Automated Optimization

You can manually follow all steps above.

Or…

Use the Win11Fly 1‑Click Script to safely automate the most effective tweaks.

✅ Takes under 60 seconds
✅ Fully reversible
✅ Beginner friendly
✅ One-time $5 payment

👉 Fix My Slow Windows 11 PC Now

Frequently Asked Questions

How much faster will Windows 11 become?

Performance improvements vary by hardware, but most users see noticeable responsiveness improvements.

Is it safe to optimize Windows 11?

Yes — when following safe, tested methods.

Does this work on 8GB RAM laptops?

Yes. Especially when combined with startup and background optimization.

Final Thoughts

You don’t need a new laptop.

You need proper optimization.

By disabling startup apps, reducing visual effects, removing background apps, fixing disk usage, updating drivers, and optimizing power settings — you can dramatically improve Windows 11 performance.

If you prefer a faster solution, the 1‑Click Script automates these steps safely.How to Optimize Windows 11 for Gaming on Low-End PCsHow to Speed Up Windows 11 on a Low-End Laptop (Beginner Guide)

Best Windows 11 Performance Settings to Make Your PC Faster (2026 Guide)

Is your Windows 11 PC running slower than it used to? Long boot times, laggy applications, gaming stutters, and slow multitasking often aren’t caused by old hardware—they’re usually the result of inefficient system settings.

The good news is that you don’t need expensive upgrades to improve performance. Windows 11 includes dozens of built-in options that can dramatically speed up your computer when configured correctly.

In this guide, you’ll discover the best Windows 11 performance settings to maximize speed, improve responsiveness, reduce CPU usage, and get the most from your hardware.

Why Windows 11  Performance Settings Can Feel Slow

Several background features prioritize appearance and convenience over raw performance.

Common causes include:

  • Startup applications
  • Visual effects
  • Background apps
  • Search indexing
  • Telemetry
  • Power-saving modes
  • Widgets
  • Transparency effects
  • Unnecessary notifications
  • Fragmented storage (HDD)

Fortunately, every one of these can be optimized.

1. Enable Best Performance Power Mode

Windows automatically balances power consumption with performance.

For desktops and gaming laptops, switch to maximum performance.

Steps

  1. Open Settings
  2. Select System
  3. Click Power & Battery
  4. Expand Power Mode
  5. Choose:

Best Performance

Benefits

✔ Faster CPU boosting

✔ Better multitasking

✔ Improved gaming performance

✔ Reduced lag

2. Disable Startup Apps

Too many startup programs slow every boot.

How to Disable

  1. Press Ctrl + Shift + Esc
  2. Open Startup Apps
  3. Sort by Startup Impact
  4. Disable unnecessary apps

Examples include:

  • Spotify
  • Discord
  • Adobe Creative Cloud
  • Teams
  • OneDrive (if unused)
  • Steam (optional)

Leave antivirus software enabled.

3. Turn Off Visual Effects

Windows animations look great—but consume system resources.

Steps

  1. Search:

Adjust the appearance and performance of Windows

  1. Select

Adjust for Best Performance

Or manually disable:

  • Fade menus
  • Window animations
  • Shadow effects
  • Animate controls

Keep:

✔ Smooth screen fonts

Benefits

Older PCs often become noticeably more responsive.

4. Reduce Background Apps

Many Microsoft Store apps continue running even when closed.

Steps

Open:

Settings

Apps

Installed Apps

Select an app

Advanced Options

Background App Permissions

Choose:

Never

Disable apps you rarely use.

5. Clean Startup Services

Press:

Windows + R

Type:

msconfig

Open:

Services

Check:

Hide Microsoft Services

Disable unnecessary third-party services.

Examples:

  • Adobe Update
  • Google Update
  • Printer software
  • RGB software

Restart afterward.

6. Turn Off Widgets

Widgets constantly refresh news, weather, and interests.

Disable them:

Settings

Personalization

Taskbar

Toggle:

Widgets

OFF

This reduces background activity.

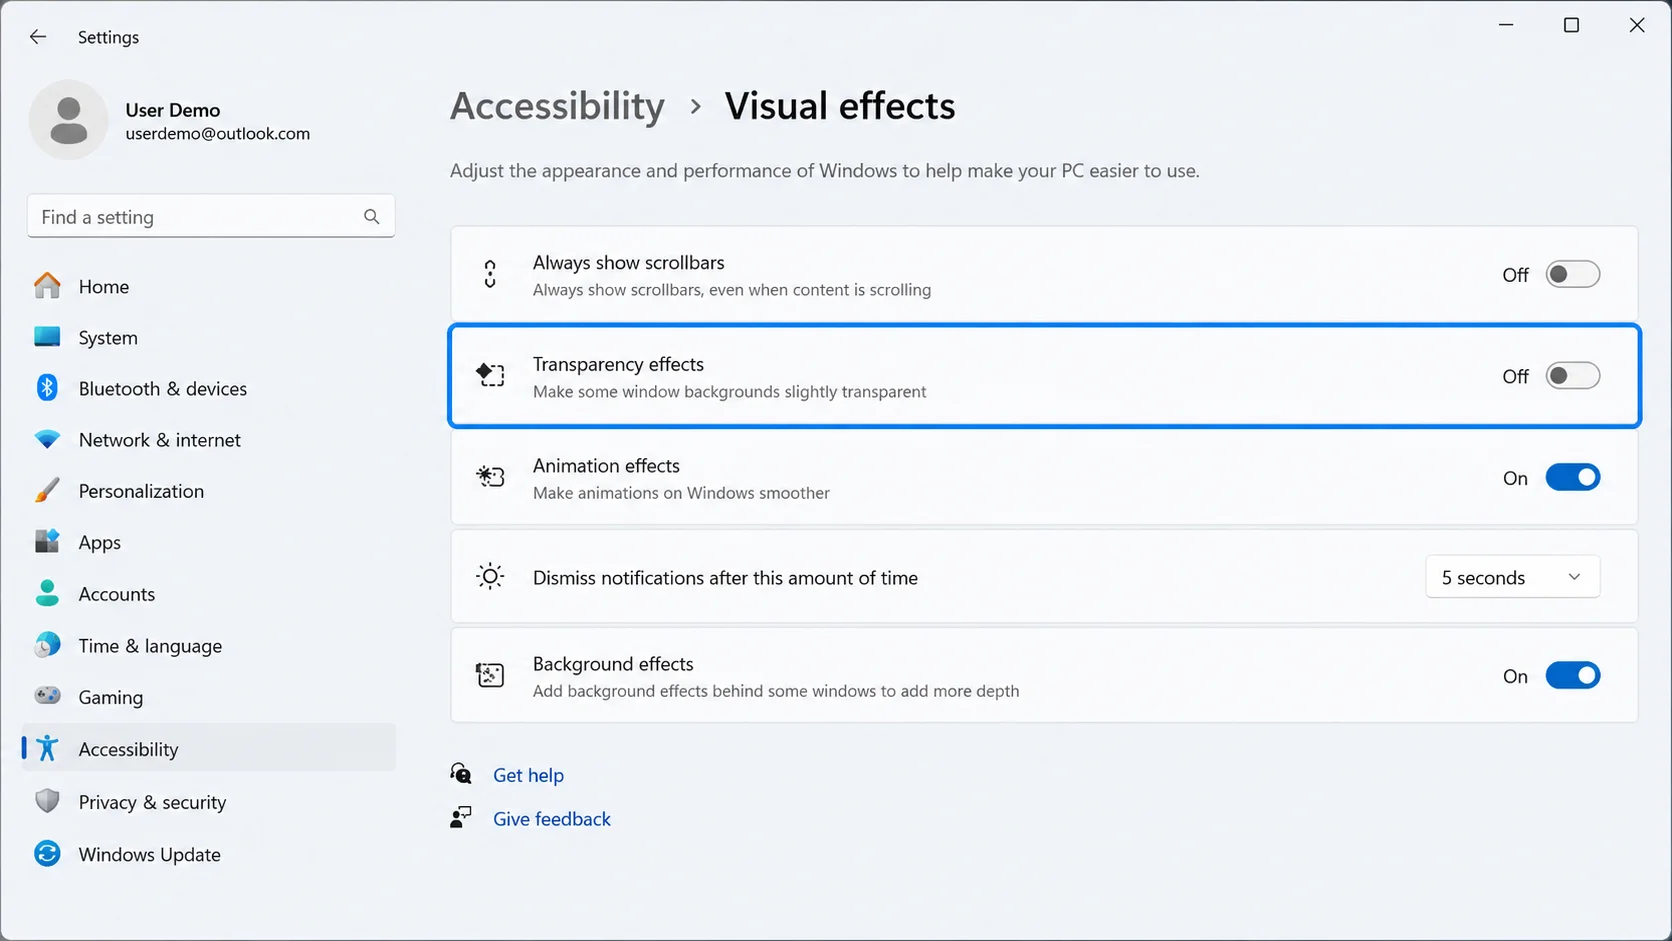
7. Disable Transparency Effects

Transparent windows use GPU resources.

Settings

Accessibility

Visual Effects

Turn OFF:

Transparency Effects

Older integrated graphics especially benefit.

8. Turn Off Animation Effects

In the same menu:

Disable:

Animation Effects

Windows instantly feels snappier.

9. Optimize Search Indexing

Search indexing scans files continuously.

Open:

Settings

Privacy & Security

Searching Windows

Choose:

Classic

Exclude folders containing:

  • Games
  • Videos
  • Downloads
  • Backups

10. Pause OneDrive Sync

Large sync operations consume:

  • CPU
  • Disk
  • Network

Pause syncing while gaming or editing video.

11. Free Up Storage

Nearly full SSDs lose performance.

Use:

Settings

Storage

Storage Sense

Enable automatic cleanup.

Delete:

  • Temporary files
  • Windows Update cache
  • Recycle Bin
  • Downloads (after reviewing)

Aim for at least 20% free space.

12. Enable Storage Sense

Storage Sense automatically removes:

  • Temporary files
  • Recycle Bin items
  • Cached files

This reduces clutter over time.

13. Keep Windows Updated

Performance updates arrive regularly.

Go to:

Settings

Windows Update

Install:

  • Cumulative updates
  • Driver updates
  • Security patches

14. Update GPU Drivers

Updated graphics drivers improve:

  • FPS
  • Stability
  • Hardware acceleration

Update through:

  • NVIDIA App
  • AMD Software: Adrenalin Edition
  • Intel Graphics Software

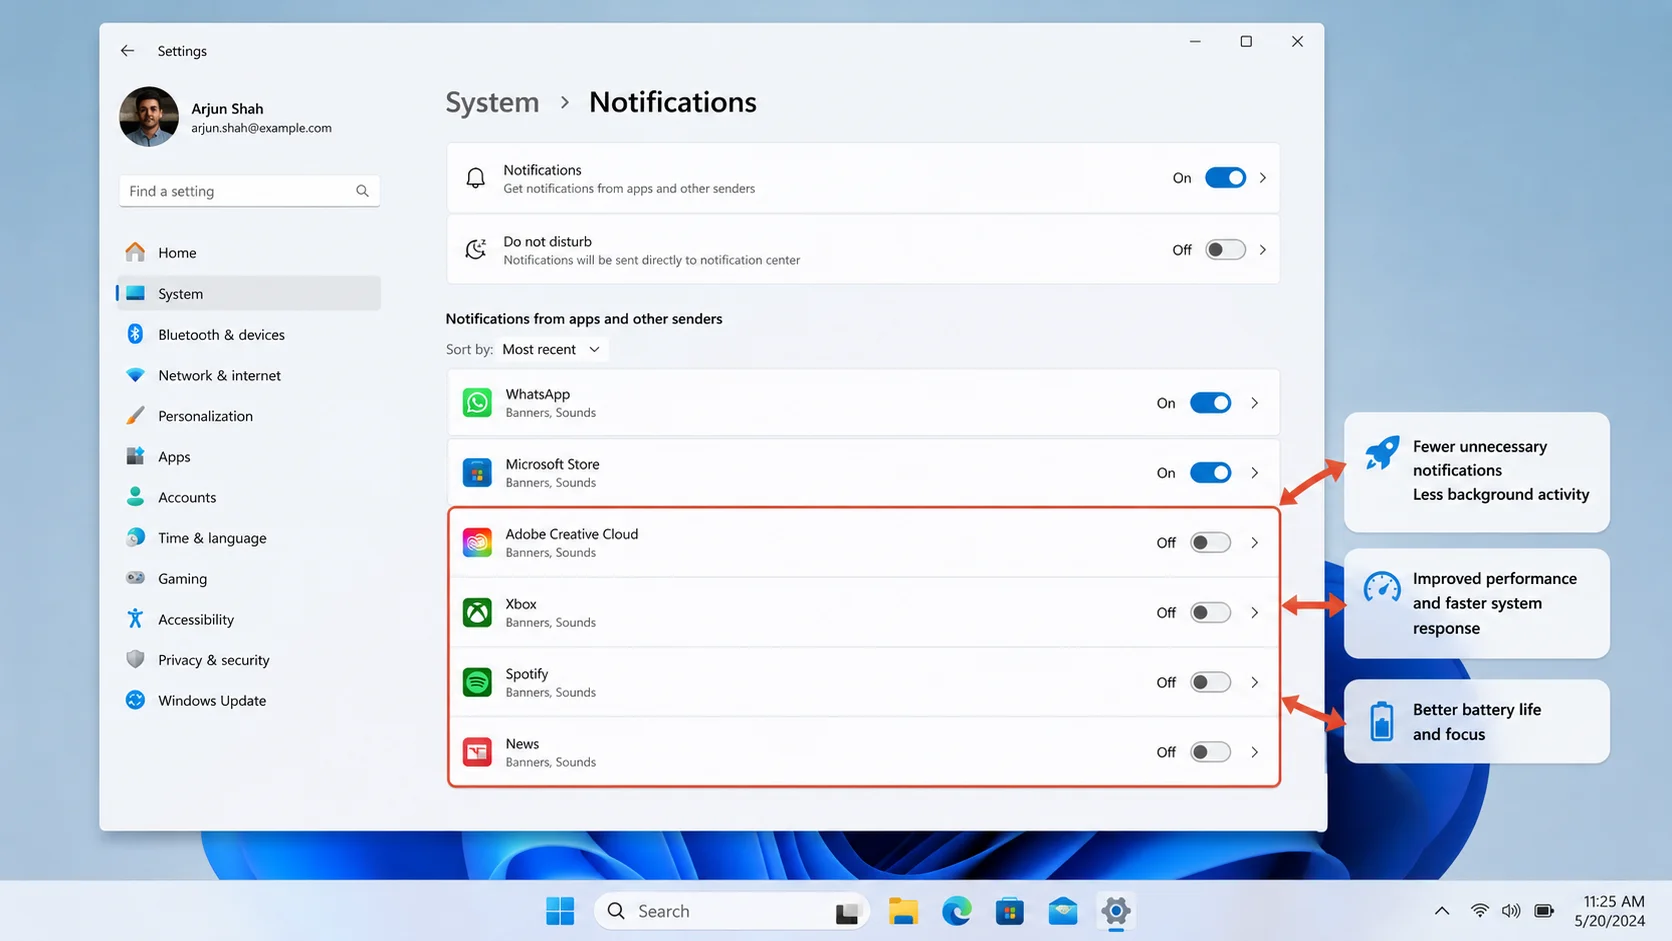
15. Disable Notifications

Constant notifications interrupt workflows.

Settings

System

Notifications

Disable unnecessary app notifications.

16. Turn Off Background Tips

Settings

System

Notifications

Additional Settings

Disable:

  • Welcome experience
  • Suggested tips
  • Feature recommendations

17. Disable Unused Startup Services

Some manufacturer software loads automatically.

Examples:

  • RGB control
  • OEM update assistants
  • Trial antivirus
  • Voice assistants

Disable if unused.

18. Optimize Virtual Memory

Windows manages page files automatically.

For low-RAM systems (8GB or less):

Open:

Advanced System Settings

Performance

Advanced

Virtual Memory

Allow Windows to manage automatically.

Avoid disabling the page file entirely.

19. Scan for Malware

Malware can silently consume CPU, RAM, and disk resources.

Run:

Microsoft Defender Offline Scan

or

Full Scan

Monthly.

20. Restart Instead of Sleeping for Long Periods

A weekly restart clears:

  • Cached memory
  • Hung processes
  • Driver issues

Many users notice immediate improvements.

Best Performance Settings Summary

Setting             Performance Impact
Best Performance Power Mode ⭐⭐⭐⭐⭐
Disable Startup Apps ⭐⭐⭐⭐⭐
Turn Off Visual Effects ⭐⭐⭐⭐⭐
Disable Transparency ⭐⭐⭐⭐
Disable Animations ⭐⭐⭐⭐
Storage Sense ⭐⭐⭐
Search Index Optimization ⭐⭐⭐⭐
Disable Widgets ⭐⭐⭐
Pause OneDrive ⭐⭐⭐
Clean Temporary Files ⭐⭐⭐⭐

Additional Tips for Gaming PCs

If you game regularly:

  • Enable Game Mode
  • Turn on Hardware-Accelerated GPU Scheduling (if supported)
  • Update graphics drivers
  • Disable overlays you don’t use
  • Close background browsers before gaming

Mistakes to Avoid

Avoid these common optimization mistakes:

  • Installing multiple registry cleaners
  • Disabling Windows Defender permanently
  • Turning off all Windows services
  • Downloading “PC booster” software
  • Editing the registry without backups
  • Disabling the page file

Built-in Windows tools are generally the safest and most effective.

Frequently Asked Questions

What is the best Windows 11 performance setting?

Using Best Performance power mode, disabling unnecessary startup apps, reducing visual effects, and keeping your system updated typically provide the biggest performance improvements.

Will disabling visual effects make Windows faster?

Yes. On older hardware or systems with integrated graphics, disabling animations and transparency can noticeably improve responsiveness.

Is Game Mode worth enabling?

Yes. Game Mode prioritizes gaming workloads by reducing background activity and allocating more resources to your game.

Can I improve Windows 11 performance without upgrading hardware?

Absolutely. Most users see meaningful gains by optimizing startup programs, background apps, storage, and power settings before considering hardware upgrades.

Should I use third-party PC optimization software?

In most cases, no. Windows 11 already includes effective optimization tools, and many third-party “boosters” offer little benefit or may introduce unwanted changes.

Final Thoughts

Optimizing the best Windows 11 performance settings doesn’t require technical expertise or expensive upgrades. By adjusting power options, reducing startup programs, disabling unnecessary visual effects, and maintaining adequate free storage, you can significantly improve your PC’s speed and responsiveness.

For the best long-term results, review these settings every few months, keep Windows and your drivers up to date, and regularly remove software you no longer use. Consistent maintenance helps ensure your system stays fast, stable, and ready for work, gaming, or everyday tasks.

how to fix high CPU usage in Windows 11

⚡ Frustrated by 100% CPU Usage? Discover the Powerful Fixes That Can Make Windows 11 Fast Again!

If you’re searching for how to fix high CPU usage in Windows 11, you’ve probably noticed your computer becoming slow, overheating, or making loud fan noises. High CPU usage can make even simple tasks like browsing the web or opening programs frustratingly slow.

Fortunately, most Windows 11 CPU problems can be fixed without replacing your hardware. In this beginner-friendly guide, you’ll learn the most effective ways to identify what’s causing the issue and how to reduce CPU usage for a smoother and faster PC experience.

Whether your CPU usage is constantly at 100% or spikes unexpectedly, these proven solutions can help restore your computer’s performance.


⚠️ BEGINNER SAFETY BANNER: 

Before modifying any system settings or editing your Windows registry, always create a system restore point.

This ensures you can instantly revert your computer back to normal if you make a mistake.

Read our [1-Minute Guide to Windows Restore Points] to set one up now.

What Causes High CPU Usage in Windows 11?

Common reasons include:

  • Too many background apps
  • Startup programs
  • Malware infections
  • Outdated drivers
  • Windows updates
  • Faulty software
  • Search indexing
  • Corrupted system files
  • Insufficient RAM

Finding the cause is the first step toward fixing it.

Restart Your Computer

A restart clears temporary processes and memory leaks.

Simply:

Start → Power → Restart

Many CPU spikes disappear after a clean reboot.


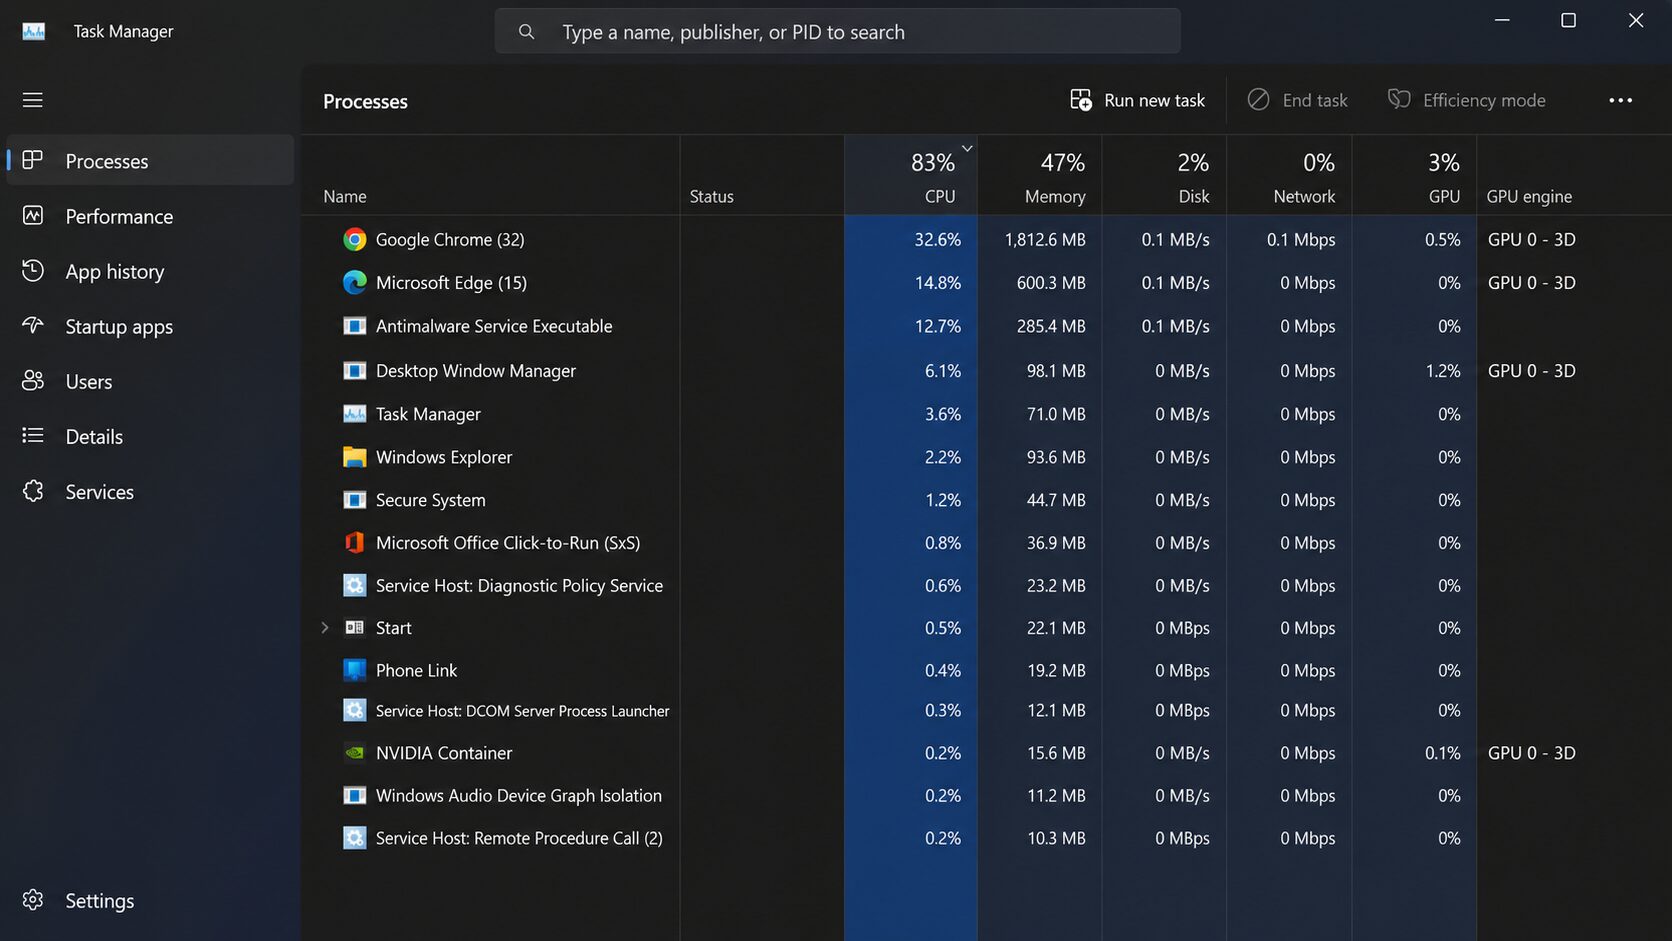
Identify CPU-Hungry Processes

Task Manager helps find the culprit.

Steps:

  1. Press Ctrl + Shift + Esc.
  2. Click Processes.
  3. Sort by CPU usage.
  4. Identify apps using excessive resources.

Common offenders:

  • Web browsers
  • Windows Update
  • Antivirus scans
  • Cloud sync apps
  • Game launchers

Close programs you don’t need.

Disable Startup Programs to Fix High CPU Usage in Windows 11

Too many startup apps increase CPU load.

Open:

Task Manager → Startup Apps

Disable:

  • Spotify
  • Discord
  • Teams
  • Adobe Updater
  • Steam
  • Epic Games Launcher

Leave security software enabled.

Update Windows

Microsoft frequently releases performance fixes.

Go to:

Settings → Windows Update

Install:

  • Security updates
  • Feature updates
  • Driver updates

Restart afterward.

Scan for Malware

Malicious software often causes unexplained CPU spikes.

Open:

Windows Security

Virus & Threat Protection

Run a Full Scan.

Avoid downloading programs from unknown websites.


Disable Background Apps

Many apps continue running even when closed.

Open:

Settings → Apps → Installed Apps

Limit background permissions for unnecessary apps.

Turn off:

  • Widgets
  • Chat apps
  • Game overlays
  • Sync services

Update Device Drivers

Outdated drivers can create CPU bottlenecks.

Update:

  • Graphics driver
  • Chipset driver
  • Network adapter
  • Audio driver

Visit your laptop or motherboard manufacturer’s support page.


Check Windows Search Indexing

Search indexing can temporarily increase CPU usage.

Go to:

Settings → Privacy & Security → Searching Windows

Choose:

Classic indexing.

Exclude large folders if necessary.

Disable SysMain

SysMain improves performance but occasionally causes CPU spikes.

Press:

Windows + R

Type:

services.msc

Find:

SysMain

Stop the service and set Startup Type to Disabled if it consistently causes issues.

Adjust Power Settings

Balanced mode may not always perform optimally.

Open:

Settings → Power & Battery

Select:

Best Performance

Desktop users should also check advanced power settings.


Check for Overheating

High temperatures force CPUs to work inefficiently.

Signs:

  • Loud fans
  • Slow performance
  • Random shutdowns

Solutions:

  • Clean dust
  • Improve airflow
  • Use a cooling pad
  • Replace thermal paste if necessary

Repair Corrupted System Files

Corrupted Windows files can increase CPU usage.

Open Command Prompt as Administrator.

Run:

sfc /scannow

Then:

DISM /Online /Cleanup-Image /RestoreHealth

Restart after completion.

Upgrade Your Hardware


If CPU usage remains high, consider upgrades.

Best improvements:

SSD

Faster loading and better responsiveness.

RAM

Upgrade to:

8GB minimum

16GB recommended.

Better Cooling

Helps maintain peak CPU performance.

Frequently Asked Questions

Why is my CPU usage at 100% in Windows 11?

Background apps, malware, Windows updates, or faulty drivers are common causes.

How do I reduce CPU usage quickly?

Restart your PC, close unnecessary apps, and disable startup programs.

Can malware cause high CPU usage?

Yes. Crypto miners and viruses often consume large amounts of CPU power.

Does Windows 11 use more CPU than Windows 10?

Windows 11 may use more resources depending on hardware and enabled features.

Should I disable SysMain?

Only if it consistently causes excessive CPU usage.

Is high CPU usage bad?

Sustained high CPU usage can reduce performance and increase heat, potentially shortening hardware lifespan.

Conclusion

Knowing how to fix high CPU usage in Windows 11 can save you from constant slowdowns, overheating, and frustrating performance issues. In most cases, identifying resource-heavy processes, disabling unnecessary startup programs, updating Windows and drivers, scanning for malware, and optimizing system settings can dramatically reduce CPU usage. For older computers, upgrading to an SSD or adding more RAM can provide an even bigger improvement. By following these practical steps and maintaining your PC regularly, you can keep Windows 11 running faster, cooler, and more efficiently for everyday work, gaming, and multitasking.

 ⚡ AUTOMATE THIS ENTIRE BLUEPRINT IN 10 SECONDS 

 Our safe, lightweight optimization utility condenses this entire 
 guide into a single script.

It triggers an automated safety restore 
point, strips structural telemetry, purges system bloatware, and 
 optimizes memory allocation with zero manual effort required. 

💰 Secure Lifetime Access for Only $5 

 👉 [ Download the 1-Click Windows 11 Optimizer Now ] 

How to Speed Up Windows 11 on a Low-End Laptop (Beginner Guide)

🚀 Is Your Windows 11 Laptop Painfully Slow? Here’s How to Make It Feel Fast Again Without Spending a Dollar

If you’ve been wondering how to speed up Windows 11 on a low-end laptop, you’re not alone. Many budget laptops come with limited RAM, slower processors, and traditional hard drives that struggle to keep up with modern software.

The good news? You don’t have to buy a new computer.

By making a few simple changes to Windows 11 settings, removing unnecessary apps, and optimizing startup processes, you can significantly improve your laptop’s performance. This beginner-friendly guide walks you through every step without requiring technical knowledge.

Whether you use your laptop for work, school, browsing, or streaming, these proven methods can help make Windows 11 feel faster and more responsive.

⚠️ BEGINNER SAFETY BANNER:

Before modifying any system settings or editing your Windows registry, always create a system restore point.

This ensures you can instantly revert your computer back to normal if you make a mistake.

Read our [1-Minute Guide to Windows Restore Points] to set one up now.

Why Windows 11 Gets Slow

Several factors can reduce performance:

  • Too many startup programs
  • Low available storage
  • Background applications
  • Outdated drivers
  • Malware
  • Limited RAM
  • Slow HDD storage

Fortunately, most of these issues can be fixed in minutes.

Restart Your Laptop First

A simple restart clears temporary memory and closes background processes.

To restart:

  1. Click Start.
  2. Select Power.
  3. Click Restart.

Avoid leaving your laptop running for weeks without restarting.


Disable Startup Programs to Speed Up Windows 11 on a Low-End Laptop

Many apps launch automatically.

Steps:

  1. Press Ctrl + Shift + Esc.
  2. Open Startup Apps.
  3. Disable unnecessary applications.

Examples:

  • Spotify
  • Discord
  • Teams
  • Adobe Updater
  • Game launchers

Only keep essential security software enabled.

Remove Apps You Don’t Use

Unused software consumes storage and resources.

Go to:

Settings → Apps → Installed Apps

Uninstall:

Old games
Trial software
Unused utilities
Duplicate programs

Only remove software you recognize.

Free Up Storage Space

Windows performs better with free storage.

Aim for at least 20% free disk space.

Delete:

  • Downloads
  • Temporary files
  • Recycle Bin contents
  • Old videos

Use:

Settings → System → Storage

Run Cleanup Recommendations.

Turn Off Fancy Visual Effects

Animations look nice but consume resources.

Disable them:

Search:

Adjust the appearance and performance of Windows

Choose:

Adjust for best performance

Or disable:

  • Animations
  • Transparency
  • Shadows

This noticeably improves responsiveness.

Enable Storage Sense

Storage Sense automatically removes unnecessary files.

Go to:

Settings → Storage

Enable:

Storage Sense

Schedule automatic cleanup weekly.

Update Windows and Drivers

Updates fix bugs and improve performance.

Check:

Settings → Windows Update

Install:

  • Windows updates
  • Driver updates
  • Security patches

Visit your laptop manufacturer’s support page for BIOS and chipset updates.

Microsoft Windows Update:
https://support.microsoft.com/windows

Intel Driver Support:
https://www.intel.com

AMD Drivers:
https://www.amd.com

Scan for Malware

Viruses can slow down any computer.

Run:

Windows Security

Virus & Threat Protection

Perform a Full Scan.

Avoid downloading software from unknown websites.

Change Power Settings

Many laptops default to balanced mode.

Go to:

Settings → Power & Battery

Select:

Best Performance

Keep your charger connected during demanding tasks.


Upgrade to an SSD

If your laptop still uses an HDD, upgrading to an SSD is the biggest improvement you can make.

Benefits:

  • Faster boot times
  • Faster app loading
  • Better multitasking
  • Improved file transfers

An SSD can make an older laptop feel new again.

Add More RAM

If possible, upgrade RAM.

Recommended:

Minimum:
8GB

Better:
16GB

More RAM helps with:

  • Web browsing
  • Office work
  • Gaming
  • Multitasking

Check your laptop specifications before upgrading.

Keep Your Browser Lightweight

Browsers often use the most RAM.

Tips:

  • Close unused tabs.
  • Remove unnecessary extensions.
  • Enable memory saver features.
  • Clear cache regularly.

Reduce Background Apps

Open:

Settings → Apps → Installed Apps

Limit apps running in the background.

Turn off:

  • Widgets
  • Chat apps
  • Gaming overlays
  • Cloud sync software you don’t use

Frequently Asked Questions

Does Windows 11 run well on low-end laptops?

Yes. With proper optimization, Windows 11 can run smoothly on budget hardware.

What is the best way to speed up Windows 11?

Disabling startup apps and upgrading to an SSD provide the biggest improvements.

Is 4GB RAM enough for Windows 11?

Windows 11 works with 4GB, but 8GB is much better for everyday use.

Should I disable Windows Defender?

No. Windows Defender provides important security protection.

How much free storage should Windows 11 have?

Keeping at least 20% of your drive free helps maintain performance.

Can an SSD make an old laptop faster?

Yes. An SSD upgrade is often the most effective performance improvement.

Conclusion

Learning how to speed up Windows 11 on a low-end laptop doesn’t require advanced technical skills or expensive upgrades. By disabling unnecessary startup programs, cleaning up storage, reducing visual effects, updating your system, and optimizing background processes, you can make your laptop noticeably faster for everyday tasks. If you’re ready for an even bigger performance boost, upgrading to an SSD or adding more RAM can extend the life of your device for years. Follow these beginner-friendly steps, maintain your system regularly, and you’ll enjoy a smoother, more responsive Windows 11 experience without replacing your laptop.

⚡ AUTOMATE THIS ENTIRE BLUEPRINT IN 10 SECONDS |

Our safe, lightweight optimization utility condenses this entire
guide into a single script.

It triggers an automated safety restore
point, strips structural telemetry, purges system bloatware, and
optimizes memory allocation with zero manual effort required.

💰 Secure Lifetime Access for Only $5

👉 [ Download the 1-Click Windows 11 Optimizer Now ] 

Turn On Your PC Instantly: How to Disable Startup Bloatware in Windows 11 to Fix Slow Boot Times

Is Windows 11 Taking Forever to Boot? Here’s the 5-Minute Fix That Actually Works

If your PC takes several minutes to become usable after turning it on, startup bloatware could be the culprit. Many Windows 11 computers come with apps and background services that launch automatically during boot, consuming valuable system resources before you even open your first program.

The good news? Learning how to disable startup bloatware in Windows 11 can dramatically improve boot times and overall system responsiveness without spending money on hardware upgrades.

In this guide, you’ll discover which startup apps are safe to disable, how to identify resource hogs, and additional tips to keep Windows 11 running at peak performance.

⚠️ SAFETY FIRST:

Before modifying any system settings or editing your Windows registry, always create a system restore point. This ensures you can instantly revert your computer back to normal if you make a mistake

Read our [1-Minute Guide to Windows Restore Points] to set one up now.

Step 1: Strip Apps Using the Modern Settings Panel

Windows 11 includes a basic manager to stop standard user apps from launching automatically.

  1. Press the Windows Key + I to open the Settings app.

  2. Click on Apps on the left menu, then select Startup at the very bottom of the right panel.

  3. Sort the list by Startup impact to see the worst offenders.

  4. Toggle the switch to Off for any app you do not explicitly need running the second your computer turns on (e.g., Spotify, Microsoft Teams, Cortana, Steam, or Discord).

    • Note: Disabling these does not delete them! It just means they won’t open until you manually double-click their icons.

Step 2: Use Task Manager for Legacy Startup Programs

Some older desktop programs bury their startup triggers deeper in the operating system, bypassing the modern settings app.

  1. Press Ctrl + Shift + Esc to open the Task Manager.

  2. Click the Startup apps icon on the left sidebar (it looks like a small speedometer or stopwatch).

  3. Look through the list for apps marked as Enabled.

  4. Right-click any non-essential app and select Disable.

    • Tip: If you see third-party update checkers or hardware helpers (like Microsoft Edge Update or updater tools from Adobe), disable them safely.

Step 3: Unlink Microsoft OneDrive (The Ultimate Laptop Speed Trick)

OneDrive comes pre-installed on Windows 11 and aggressively synchronizes your files in the background during system startup, creating massive stuttering on budget CPUs.

  1. Look at the bottom right corner of your taskbar and click the little up-arrow to show hidden icons.

  2. Click the blue OneDrive cloud icon.

  3. Click the Gear icon (Settings) in the top right of the OneDrive window and choose Settings.

  4. On the Sync and backup tab, toggle off Start OneDrive when I sign in to Windows.

  5. Restart your computer to feel the difference.

What Is Startup Bloatware?

Startup bloatware refers to applications and services configured to launch automatically when Windows starts.

Common examples include:

  • Chat applications
  • Gaming launchers
  • Cloud storage clients
  • Printer utilities
  • RGB lighting software
  • Update managers
  • OEM manufacturer utilities

Many of these programs aren’t harmful, but they don’t need to run immediately after startup.

Why Startup Bloatware Slows Windows 11

Every startup application:

  • Uses CPU cycles.
  • Consumes RAM.
  • Accesses storage.
  • Competes for network bandwidth.
  • Delays the desktop becoming fully responsive.

If you have 15-20 startup programs, they can significantly increase boot times.

Signs you have startup bloatware:

  • Long spinning loading icon.
  • Slow login.
  • Desktop icons load slowly.
  • Apps freeze after boot.
  • High CPU usage immediately after startup.

How to Disable Startup Bloatware in Windows 11

One of the easiest methods is through Settings.

Step 1

Open:

Settings → Apps → Startup

You’ll see:

  • App name
  • Startup impact
  • On/Off toggle

Step 2

Sort by Startup Impact.

Focus on:

  • High Impact
  • Medium Impact

Turn off anything you don’t need immediately after login.

Good candidates:

✅ Spotify

✅ Discord

✅ Steam

✅ Epic Games Launcher

✅ Microsoft Teams

✅ Adobe Creative Cloud

✅ Zoom

Leave security software enabled.

Remove Unnecessary Startup Apps

Another effective method is Task Manager.

Press:

Ctrl + Shift + Esc

Go to:

Startup Apps

You’ll see:

Program                   Safe to Disable
Spotify                              Yes
Discord                             Yes
Steam                                Yes
OneDrive Optional
Teams                                  Yes
Adobe Updater                    Yes
Right-click and choose:

Disable.

Changes take effect after restarting.

Disable Startup Programs from Task Manager

Task Manager provides startup impact ratings:

Low Impact

Minimal effect.

Medium Impact

Moderate resource usage.

High Impact

Significant slowdown.

Prioritize disabling High Impact apps you rarely use.

Manage Background Apps

Background apps continue running after startup.

Go to:

Settings → Apps → Installed Apps

Click:

Advanced Options

Adjust background permissions if available.

Also review:

Settings → Privacy & Security.

Remove Manufacturer Bloatware

Many PCs include OEM software.

Common examples:

  • Trial antivirus
  • PC optimization suites
  • Shopping apps
  • Media players
  • OEM support assistants

Remove unwanted apps via:

Settings → Apps → Installed Apps

Uninstall only software you recognize and don’t use.

Additional Ways to Speed Up Windows 11

Disabling startup bloatware is only one optimization.

Enable Storage Sense

Automatically cleans temporary files.

Keep Windows Updated

Updates often improve performance.

Upgrade to an SSD

The biggest boot-time improvement.

Increase RAM

Helps multitasking.

Scan for Malware

Malicious software often adds hidden startup entries.

Disable Startup Browser Tabs

Browsers restoring dozens of tabs can slow startup.


Common Startup Apps You Can Safely Disable

Application Safe to Disable
Spotify Yes
Discord Yes
Steam Yes
Epic Games Yes
Zoom Yes
Adobe Creative Cloud Yes
Microsoft Teams Yes
Skype Yes
Slack Yes
Dropbox Optional
OneDrive Optional
Printer Utilities Usually

Keep enabled:

  • Windows Security
  • Antivirus
  • Hardware drivers
  • Touchpad utilities
  • Audio drivers

Frequently Asked Questions

Is it safe to disable startup apps in Windows 11?

Yes. Most third-party applications can safely be disabled without affecting Windows functionality.


Will disabling startup apps improve boot time?

Yes. Fewer programs loading means Windows can become responsive much faster.


What’s the difference between disabling and uninstalling?

Disabling prevents automatic startup.

Uninstalling removes the software entirely.


Can I re-enable startup apps later?

Absolutely.

Simply return to Settings or Task Manager and switch them back on.


Should I disable Microsoft Defender?

No.

Security software should remain active to protect your PC.


How many startup programs should I have?

Ideally, only essential security and hardware-related applications should launch automatically.


Conclusion

Disabling startup bloatware is one of the quickest and safest ways to improve Windows 11 performance. By removing unnecessary applications from the startup process, managing background activity, and uninstalling unwanted manufacturer software, you can reduce boot times and make your PC feel faster every day. Regularly reviewing your startup apps and keeping only essential programs enabled ensures that Windows 11 stays responsive without requiring expensive hardware upgrades. If you’re looking for an easy performance boost, mastering how to disable startup bloatware in Windows 11 is an excellent place to start and can deliver noticeable results in just a few minutes.

🚀 Erase Deep System Bloatware in 1-Click

While disabling startup items handles basic consumer apps, it leaves behind the invisible, system-level Microsoft bloatware—like Xbox services, Edge tracking widgets, and Cortana background loops—that Windows forbids you from turning off manually.

🧹 FULLY CLEAN OUT YOUR SYSTEM BACKGROUND

Our safe 1-Click Optimization Script runs deep PowerShell commands |
to strip out hidden system bloatware, disable heavy background
scheduled tasks, and give you a completely clean slate upon boot.

👉 Download the 1-Click Windows 11 Optimizer ($5) 

How to Disable Windows 11 Animation Delays for Instant Responsiveness

Your Windows 11 PC Isn’t Slow—These Hidden Animation Delays Are Making It Feel That Way

if your Windows 11 PC feels sluggish even though it has modern hardware, visual effects and animation delays could be the hidden culprit. Every time you open the Start menu, switch between windows, or minimize an application, Windows uses small animations to create a smoother experience. While these effects look attractive, they can make your computer feel less responsive.

Fortunately, learning how to disable Windows 11 animation delays is one of the quickest ways to make your PC feel faster without spending money on upgrades. In just a few minutes, you can reduce unnecessary visual effects and enjoy snappier menus, faster window transitions, and a more responsive desktop.

This guide explains exactly how to disable Windows 11 animation delays safely while keeping your system stable and visually appealing.

⚠️ BEGINNER SAFETY BANNER:
Before modifying any system settings or editing your Windows registry, always create a system restore point. This ensures you can instantly revert your computer back to normal if you make a mistake.

Read our [1-Minute Guide to Windows Restore Points] to set one up now.

Step 1: Open the Advanced System Settings

To get to the core performance options in Windows 11, we need to bypass the basic settings app and go straight to the legacy control panel.

  1. Press the Windows Key + R on your keyboard to open the Run dialog box.

  2. Type sysdm.cpl into the box and press Enter.

  3. A small window titled System Properties will pop up. Click on the Advanced tab at the top.

Step 2: Access the Performance Menu

Inside the Advanced tab, Windows houses its hidden performance allocation settings.

  1. Look for the Performance section at the very top of the tab.

  2. Click the Settings… button.

Step 3: Switch to Custom and Disable Delays

This is where we strip away the bloatware animations causing your UI lag.

  1. Under the Visual Effects tab, click the radio button that says Custom:.

  2. Uncheck the following three specific boxes to maximize your speed:

    • Animate controls and elements inside windows

    • Animate windows when minimizing and maximizing

    • Animations in the taskbar

  3. (Optional) If your PC is incredibly slow, you can also uncheck Show shadows under windows.

  4. Click Apply, then click OK.

Step 4: The Finishing Touch (Registry Speed Hack)

Windows still holds a native 400-millisecond delay timer before dropdown menus appear. Let’s drop that to zero.

  1. Press the Windows Key, type regedit, and press Enter to open the Registry Editor.

  2. Navigate to this exact path in the top address bar: HKEY_CURRENT_USER\Control Panel\Desktop

  3. Look on the right-hand panel for a value named MenuShowDelay.

  4. Double-click it, change the Value Data from 400 to 20, and click OK.

  5. Restart your computer to let the changes take effect.

What Are Windows 11 Animation Delays?

Animation delays are visual transitions that occur when:

  • Opening windows.
  • Closing applications.
  • Switching desktops.
  • Launching the Start menu.
  • Opening context menus.
  • Minimizing and maximizing programs.

These effects make Windows look polished but require CPU and GPU resources.

Do Animation Delays Affect Performance?

On modern PCs, animations have minimal hardware impact. However, they can affect perceived responsiveness.

Benefits of disabling animations include:

  • Faster menu navigation.
  • Snappier window switching.
  • Improved responsiveness.
  • Reduced input delay.
  • Better experience on older hardware.
  • Slight battery savings on laptops.

Users with lower-end systems often notice the biggest improvement.

How to Disable Windows 11 Animation Delays

The easiest method uses Accessibility settings.

Open:

Settings → Accessibility → Visual Effects

Turn off:

✅ Animation Effects.

Windows immediately disables many transition animations.

Adjust Visual Effects Settings

A more comprehensive approach uses System Properties.

Press:

Windows + R

Type:

SystemPropertiesPerformance.exe

Open:

Visual Effects.

Choose:

Adjust for Best Performance

Or manually disable:

  • Animate windows when minimizing and maximizing.
  • Fade or slide menus.
  • Fade tooltips.
  • Slide open combo boxes.
  • Animate controls inside windows.

Keep enabled if desired:

  • Smooth screen fonts.
  • Show thumbnails.
  • Show window contents while dragging.

Turn Off Transparency Effects

Transparency effects also use graphics resources.

Go to:

Settings → Personalization → Colors.

Disable:

Transparency Effects.

Benefits:

  • Cleaner interface.
  • Faster rendering.
  • Slight GPU savings.
  • Better battery life.

Use Performance Mode

Optimize Windows power settings.

Open:

Settings → System → Power & Battery.

Choose:

Best Performance.

Desktop users should also review advanced power settings for maximum responsiveness.

Registry Tweaks for Advanced Users

Advanced users may reduce menu animation timing.

Press:

Windows + R

Type:

regedit

Navigate to:

HKEY_CURRENT_USER\Control Panel\Desktop

Locate:

MenuShowDelay

Default:

400

Recommended:

200

Aggressive:

100

Avoid setting to zero, as some users experience interface glitches.

Always create a restore point before modifying the registry.

Other Windows 11 Speed Optimizations

Disabling animations works best alongside other tweaks.

Disable Startup Bloatware

Reduce startup load.

Manage Background Apps

Limit unnecessary processes.

Reduce Telemetry

Lower background activity.

Remove Temporary Files

Free storage space.

Keep Drivers Updated

Improve system compatibility.

Upgrade to an SSD

The most noticeable hardware improvement.

Should You Disable All Animations?

Not necessarily.

Many users prefer a balanced approach.

Recommended:

Disable:

✅ Animation effects.

✅ Menu fades.

✅ Transparency.

Keep:

✅ Font smoothing.

✅ Thumbnail previews.

✅ Window content while dragging.

This provides a responsive experience without making Windows look outdated.

Frequently Asked Questions

Does disabling animations make Windows 11 faster?

It mainly improves perceived responsiveness and can slightly reduce resource usage.


Is it safe to disable animation effects?

Yes. These are built-in Windows settings and completely safe to modify.


Can I restore animations later?

Yes. Simply re-enable the settings at any time.


Does disabling animations improve gaming?

Not significantly, but reducing background graphics effects may slightly improve system responsiveness.


Should I change Menu Show Delay?

Reducing it moderately can make menus appear faster, but extreme values are not recommended.

Conclusion

Windows 11’s animations and visual effects add polish to the user experience, but they can also make your PC feel slower than it really is. By learning how to disable Windows 11 animation delays, adjusting visual effects, reducing transparency, optimizing power settings, and carefully tuning advanced options, you can create a noticeably more responsive desktop without spending money on hardware upgrades. Combining these changes with other performance tweaks—such as managing startup apps and limiting background processes—can deliver an even smoother Windows 11 experience. Whether you’re using an older laptop or a powerful gaming PC, reducing unnecessary animations is a quick and safe way to make every click and window transition feel almost instant.

🚀 The 1-Click Solution: Automate This Entire Guide

While doing this manually works perfectly, Microsoft has a habit of resetting these registry keys and visual settings during major Windows updates.

 💡 TIRED OF MANUAL TWEAKS?

Our safe, lightweight 1-Click Optimization Script changes this
animation delay, strips system telemetry, and permanently locks in
over 25+ performance optimizations instantly.
|
 👉 Download the 1-Click Windows 11 Optimizer ($5)